

LA-210

An opto comp, a tape, a soft clip — as free as the freeway

Beta 1

Interface Preview

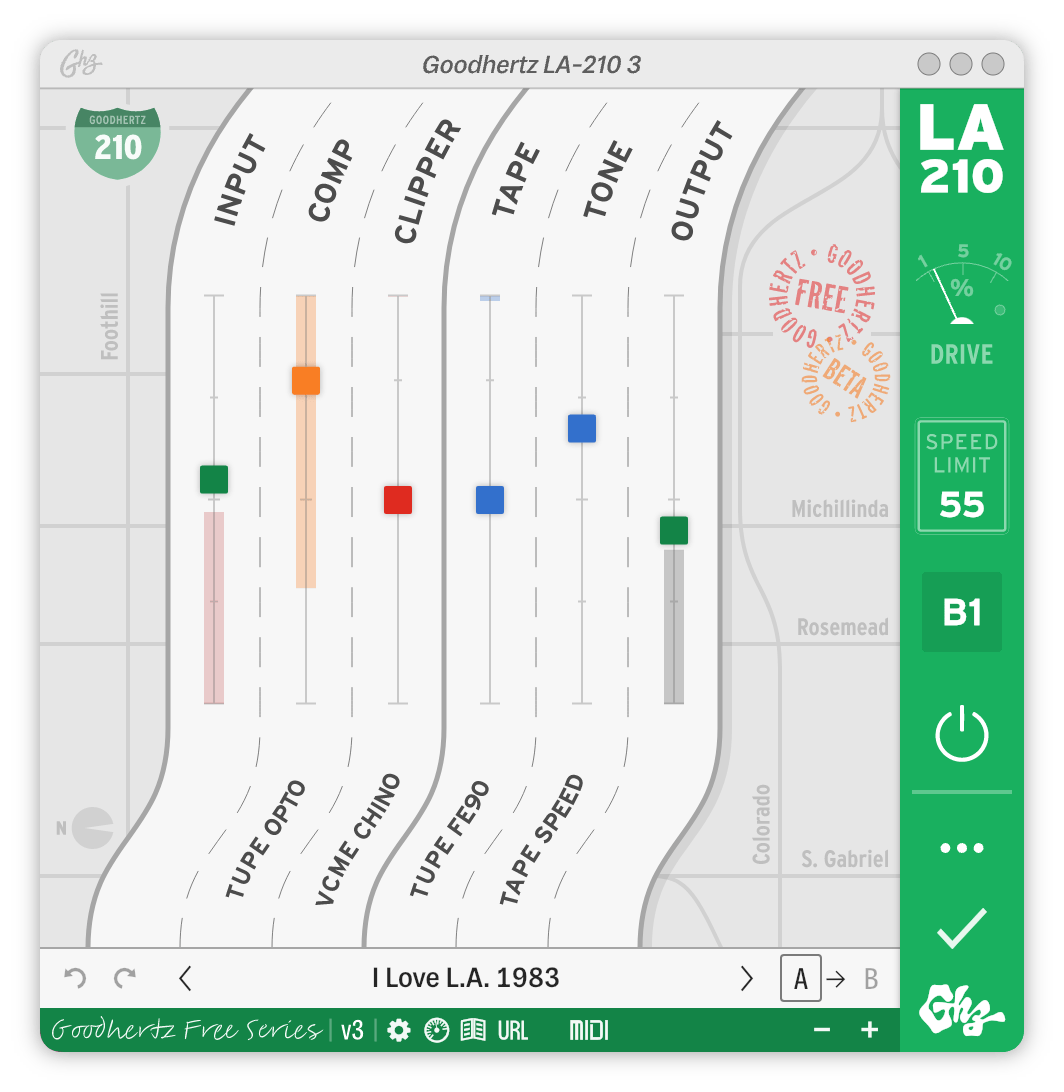
Here’s a screenshot of LA-210 in action. Click anywhere on the interface to jump to a control’s definition below.

Advanced Controls

Controls

Primary Controls

Input

Controls the input level before it hits the rest of LA-210’s processing.

Input includes a level meter embedded in the slider. This meter shows the peak level of the input signal before LA-210’s processing.

If the signal peak exceeds or equals 0.0dB the meter color turns red.

  • Default 0.0dB

Comp

Adjusts the amount of compression applied by Tupe’s Opto section.

Comp includes a gain reduction meter embedded in the slider. The halfway point corresponds to approximately 5 dB of gain reduction.

  • Default 100%

Clip

Adjusts the amount of soft-clipping applied by VCME’s Soft Clip section.

Clip includes a gain reduction meter embedded in the slider. The halfway point corresponds to approximately 5 dB of gain reduction.

  • Default 100%

Tape

Adjusts the amount of tape saturation and tape wow applied by Tupe’s Tape section.

Tape includes a gain reduction meter embedded in the slider. The halfway point corresponds to approximately 5 dB of gain reduction.

  • Default 100%

Tone

Adjusts the tape speed of Tupe’s Tape section.

Tone adjusts both the wow speed and the frequency response of the tape.

  • Default 100%

Output

Controls the output level after LA-210’s processing.

Output includes a level meter embedded in the slider. This meter shows the peak level of the output signal after LA-210’s processing.

If the signal peak exceeds or equals 0.0dB the meter color turns red, indicating that clipping could occur. LA-210 will never clip internally, due to its double-precision floating-point processing, but the signal might be clipped at a later stage (by the host/DAW or DAC).

  • Default 0.0dB

VU Meter Mode

VU Meter Mode switches LA-210’s VU meter display mode between drive level, gain reduction, and output level.

Option About
DRIVE

Drive Meter

GR

Gain Reduction

OUT

Output Meter

Use the DRIVE mode to meter the approximate Total Harmonic Distortion (THD) in LA-210.

Use the GR (gain reduction) mode to meter the total gain reduction in LA-210. This includes any natural gain reduction caused by the tape or clipper sections.

  • Default DRIVE

Speed Limit

Controls LA-210’s highway speed limit (i.e. overall amount of processing).

At 25mph, LA-210’s processing is reduced. Might as well drive on Route 66 instead.

At 65mph, LA-210 operates at its standard speed limit.

At 99mph, LA-210 creates the gnarliest sounds possible. Watch out for speeding tickets.

  • Default 65

Master On/Off

Bypasses LA-210’s processing.

We recommend using the Master On/Off instead of your DAW’s plugin bypass to avoid digital artifacts.

  • Default On

Advanced Controls

The Advanced section offers more precise control and fine adjustment options.

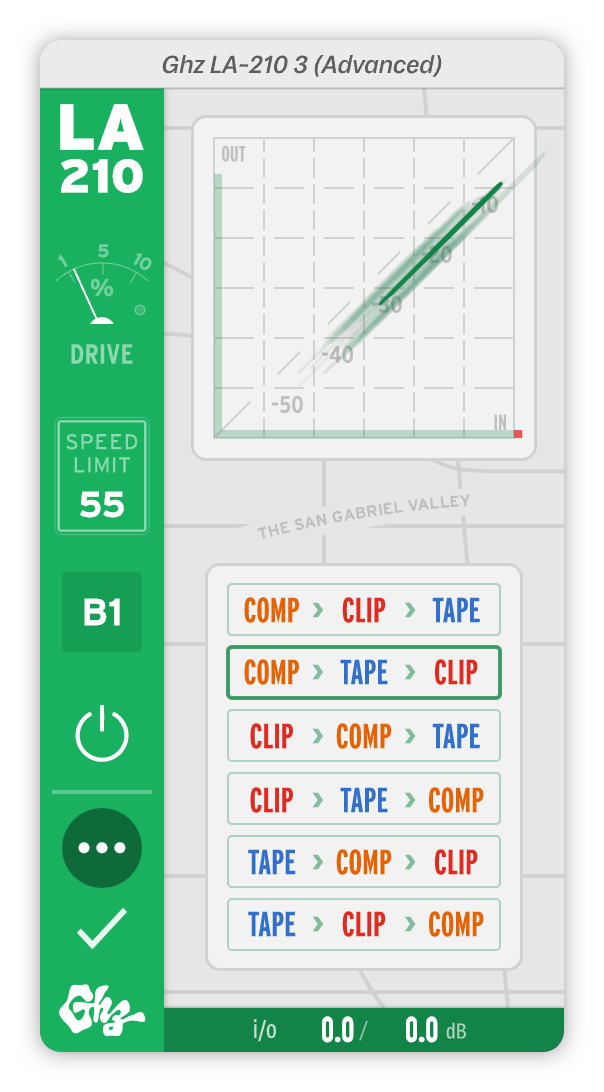
To access LA-210’s advanced controls, click the ••• icon in the sidebar.

Ordering

Changes the processing order of the Comp, Clip, and Tape sections.

Options: Comp > Clip > Tape, Comp > Tape > Clip, Clip > Comp > Tape, Clip > Tape > Comp, Tape > Comp > Clip, Tape > Clip > Comp

  • Default Comp > Clip > Tape

Preprocess Input Gain

Controls the input gain before it hits LA-210’s processing.

  • Default 0.0

Postprocess Output Gain

Controls the output gain after LA-210’s processing.

  • Default 0.0

Specs

Supported Channel Configurations

Input Channel # Output Channel #
Stereo Stereo

Acknowledgements

Authors

Devin Kerr / Rob Stenson / Jasper Duba / Noah Dayan

Translators

TaeHo Park / Tiago Frúgoli / Gustavo Guzmán / Reda Kermach / Noah Dayan / Gal Cohen / Sydney Bolton / Enrico Cirene

About Goodhertz Plugins

User Interface

Goodhertz plugins are made to be workhorse tools that sound amazing. We’ve put a lot of thought and care into the audio quality and plugin usability, and for that reason, we’ve opted for simple and direct controls & interfaces that don’t rely on photorealistic knobs or ornamental screw heads to communicate their meaning.

We’ve also decided to only include meters and graphs when we feel they will directly lead to a better sonic result. Meters/graphs can consume significant CPU resources, and we firmly believe that if it sounds good, it is good.

Our meters can be reset at any time using the “Reset Meters” button (in certain plugins) and manually enabled or disabled via the “Enable Metering” User Preference.

Preset Bar

Button Action
Undo the last parameter change.
Redo the last parameter change.
Switch to the previous preset.
“Preset Name” Opens the preset drawer (Option/Alt + Click to reset all plugin settings to preset).
Switch to the next preset.
Selects the A settings state.
This copies the current settings to the opposite A/B state; i.e. if you’re on the A state, clicking the arrow will copy those settings to the B state.
Selects the B settings state.

Toolbar

Introduced in version 3.10, the toolbar at the bottom of the plugin holds a handful of shortcut buttons.

Icon Action
Opens preferences menu
Shows diagnostic information
Opens plugin manual in your default web browser
Opens a URL representation of the current plugin control state (Command/Ctrl + Click to copy the URL to the clipboard)
Opens language-selection menu
Opens MIDI Learn menu
Toggles HQ mode (only in certain plugins)
Resets all meters (only in certain plugins)
Shrink interface
Enlarge interface

Keyboard Shortcuts

Action Keyboard Shortcut
Enter New Parameter Value Once you’ve clicked or double-clicked a control, type in a value, then hit Enter, Return, or Tab. Depending on the control type, we support a variety of input values, such as fractions (e.g. 1/4 for 0.25), the kilo suffix (e.g. 4k for 4000), note values for time-based controls (e.g. 1/8T for an eighth note triplet or 1/4D for a dotted quarter note, relative to the current DAW or plugin BPM), and musical notes for frequency controls (e.g. A#5 for 923.33 Hz or Eb2 for 77.78 Hz).
Increment Parameter Value or arrow keys
Decrement Parameter Value or arrow keys
Jump to Next Parameter Tab
Jump to Previous Parameter Shift + Tab or ` (backtick)
Escape Parameter Focus / Close any Open Drawers Esc
Tap Tempo t or Click (N.B. For this to work, you must have a BPM or milliseconds control selected.)
Save Preset n (N.B. For this to work, the preset panel must be open.)
Set Preset as Favorite f (N.B. For this to work, the preset panel must be open.)
Edit Preset e (N.B. For this to work, the preset panel must be open.)
Update Preset u (N.B. For this to work, the preset panel must be open.)
Delete Preset Delete (N.B. For this to work, the preset panel must be open.)

Right-Click Actions

Action Instruction
Read about Control in manual Right-Click & select “Show in Plugin Manual”
Reset Control to Default Right-Click & select “Reset to Factory Default Value”
Lock Control when switching presets Right-Click & select “Lock When Switching Presets”
Copy current plugin settings to clipboard Right-Click & select “Copy as URL to Clipboard”
Paste all plugin settings from clipboard Right-Click & select “Paste From Clipboard”
Reset all plugin settings to Defaults Right-Click & select “Reset All to Defaults”
Reset all plugin metering Right-Click & select “Reset Meters” (only available in certain plugins)
Reset all plugin settings to Preset Right-Click & select “Reset to [preset] Preset”
Update Preset with current plugin settings Right-Click & select “Update [preset] Preset”
Create new Preset with current plugin settings Right-Click & select “Create New Preset”
Go to the plugin’s manual page Right-Click & select “Read [plugin name] Manual”

Right-Click Preferences

Action Explanation
Language Switch the display language of text elements in Goodhertz plugins. We currently support the following languages: English, Spanish, Portuguese, French, Italian, Japanese, Korean, Chinese (Simplified), Chinese (Traditional), and Arabic.
Always Open Advanced Pane By default, this is Off — i.e. when the plugins open, they do not show you the advanced controls available by hitting the ••• button in the sidebar. If you’d like to always see the advanced controls, enable this preference.
Control Granularity By default, all Goodhertz controls move in small increments when dragged. If you prefer controls to operate with larger increments by default, change this option to Coarse. N.B. This will swap the behavior of the Shift mouse modifier - i.e. Shift-dragging will move a control with standard granularity when set to Coarse.
Dark Mode Allows you to choose the color palette used for displaying the interface. If you prefer the look of dark colors (or work in a darker environment) enable this option. The Auto option will automatically adjust the color scheme depending on the system preferences of your machine (Mac only).
Enable Hover Markers By default, this is On — i.e. all controls will show markers on hover. If you find this behavior unnecessary, deselect this option and no markers will be shown.
Enable Metering By default, this is On — i.e. in normal operation, all audio meters and visualizations available in Goodhertz plugins are enabled and running. If you’d like to turn them off and disable all metering and visualization, deselect this option. And to turn them back on, simply reselect it. N.B. If you’re struggling to use a large number of Goodhertz plugins on an older processor with an integrated GPU, sometimes disabling metering can help.
Enable Scroll Input By default, all Goodhertz sliders can be scrolled in addition to dragged. If you find this behavior unnecessary, deselect this option and no scrolling events will be used to control Goodhertz sliders.
Enable Tooltips By default, this is On — i.e. all controls will show a tooltip on hover. If you find this behavior unnecessary, deselect this option and no tooltips will be shown.
GPU Acceleration By default, this is Enabled — i.e. the GPU will be prioritized whenever possible to improve graphics performance. If your graphics card does not support GPU acceleration, this preference will be automatically set to Reduced. N.B. If you experience graphics issues, disabling this preference may help.
Keyboard Focus By default, you can get keyboard focus on any Goodhertz control with a single click. Change this option to ensure keyboard focus only occurs on double clicks.
Window Size Enlarge or shrink the Goodhertz plugin window by selecting an option here. This will save your preference for all instances of this plugin.
Diagnostics Displays general information about the plugin and the configuration of your system for diagnostic purposes. If you experience any issues with the plugin, it can be helpful to include this information when contacting us. N.B. Clicking this window will copy the contents to the clipboard.
MIDI Learn Configure the mapping used to control parameters via MIDI messages. To assign a MIDI number to a control, enable MIDI Learn and send a MIDI message while a control is focused. To remove an assigned mapping, click on a mapping entry in the list or select Clear All to reset the entire mapping. N.B. You can assign different types of MIDI messages including Pitch Bend, Note, and CC messages.

Mouse Modifiers

Action Combination (Mac) Combination (Windows)
Reset Parameter to Default Value Option + Click Alt + Click
Move Control with Coarse Precision Shift + Drag Shift + Drag
Move Control with Fine Precision Command + Drag Ctrl + Drag
Move Control with Normal Precision Drag Drag

Automation

Unintentional digital clicks and pops are the worst. They happen for lots of reasons and often end up wasting your time with needless revisions or mastering surgery. When they go unnoticed, they can make their way onto commercial albums and releases.

Plugin automation is a common cause of clicks and pops. Sweeping an EQ band, changing a delay setting, and even automating a plugin bypass can cause digital artifacts if poorly handled.

This is not true for Goodhertz plugins. Any parameter in a Goodhertz plugin, even on/off switches, can be automated freely and smoothly without clicks, pops, or zipper noises (unless otherwise noted). You can push them, pull them, LFO them — whatever you do, they’ll handle it gracefully.

Since our Master On/Off controls won’t create artifacts, we recommend that you use them rather than your DAW-supplied plugin bypass if you want to disable plugin processing.

Plugin Settings

Goodhertz plugin settings can be copied and pasted as text urls, which look like this: https://goodhertz.com/vulf-comp/3.0.9?cm=0&wf=0&lf=100&lfc=50

To copy and paste, right click anywhere on the plugin interface and select either the copy or the paste option.

E.g. If you paste “https://goodhertz.com/vulf-comp/3.0.9?cm=0&wf=0&lf=100&lfc=50” into Vulf Compressor it will recall the settings associated with that url. This way you can easily send an exact plugin setting to someone — in an email or a text — without any guesswork or screenshots.

System Requirements

Mac OS X ≥ 10.13

Audio Unit 64-Bit, VST 64-Bit, VST3 64-Bit, or AAX 64-Bit host

Windows ≥ 10

VST 64-Bit, VST3 64-Bit, or AAX 64-Bit host

Contact Support

To send plugin feedback, please e-mail us at feedback@goodhertz.com.

If you’re having trouble, experiencing a technical issue, or you think you’ve found a bug, please email support@goodhertz.com.

Find all our contact info & bug-reporting protocol on the contact page.