

VCME

Vulf Compressor Mastering Edition

From the moment we released Vulf Compressor in 2014, I wished there was a mastering version.

We’d made an incredible, one-of-a-kind compressor. A compressor capable of producing gigantic sounds you just couldn’t get any other way. But what gave Vulf its explosive power also made it nearly impossible for me to use on a master. Where Vulf Comp brought instant vibe & color, I needed subtle sweetening & surgical control.

Having developed the Vulf Compressor algorithm in pieces, I knew how amazing the compressor could be for mastering, and every so often, I would come across a master that it would be perfect for and dream of that sound.

So, later in 2015, we began working on a mastering-specific version of Vulf Comp that we initially called V2B (Vulf 2-Bus). Development was slow and full of difficult design choices, meaning V2B ended up sitting on the shelf collecting dust. Years passed.

But then as we approached the 10th anniversary of Vulf Compressor (and Goodhertz), we gave the mastering version another thought: perhaps it’d be the perfect moment to finally make Vulf Compressor Mastering Edition.

So we threw out V2B and started over, this time drawing on our 10 years of experience and a renewed perspective on what the mastering version of Vulf Compressor could and should be.

Early prototypes were positive, and as the new Soft Clip section took shape, we realized that we’d actually made two new plugins: Vulf Compressor Mastering Edition (VCME) and VCME Soft Clip. Once we sent out the first beta to presale owners, the incredible feedback and suggestions pushed the plugin even further.

The end result: a completely new Vulf Compressor. Cut from the same cloth as the original, but with its own distinct voice. Vulf Compressor Mastering Edition has controls and features that no other compressor has: it’s deep, it’s flexible, it’s complicated… but only if you need it to be.

Instead of instant vibe, VCME is choose-your-own-adventure, and we truly hope you enjoy that adventure. Thanks for coming aboard!

– Devin Kerr, Goodhertz Co-Founder

Interface Preview

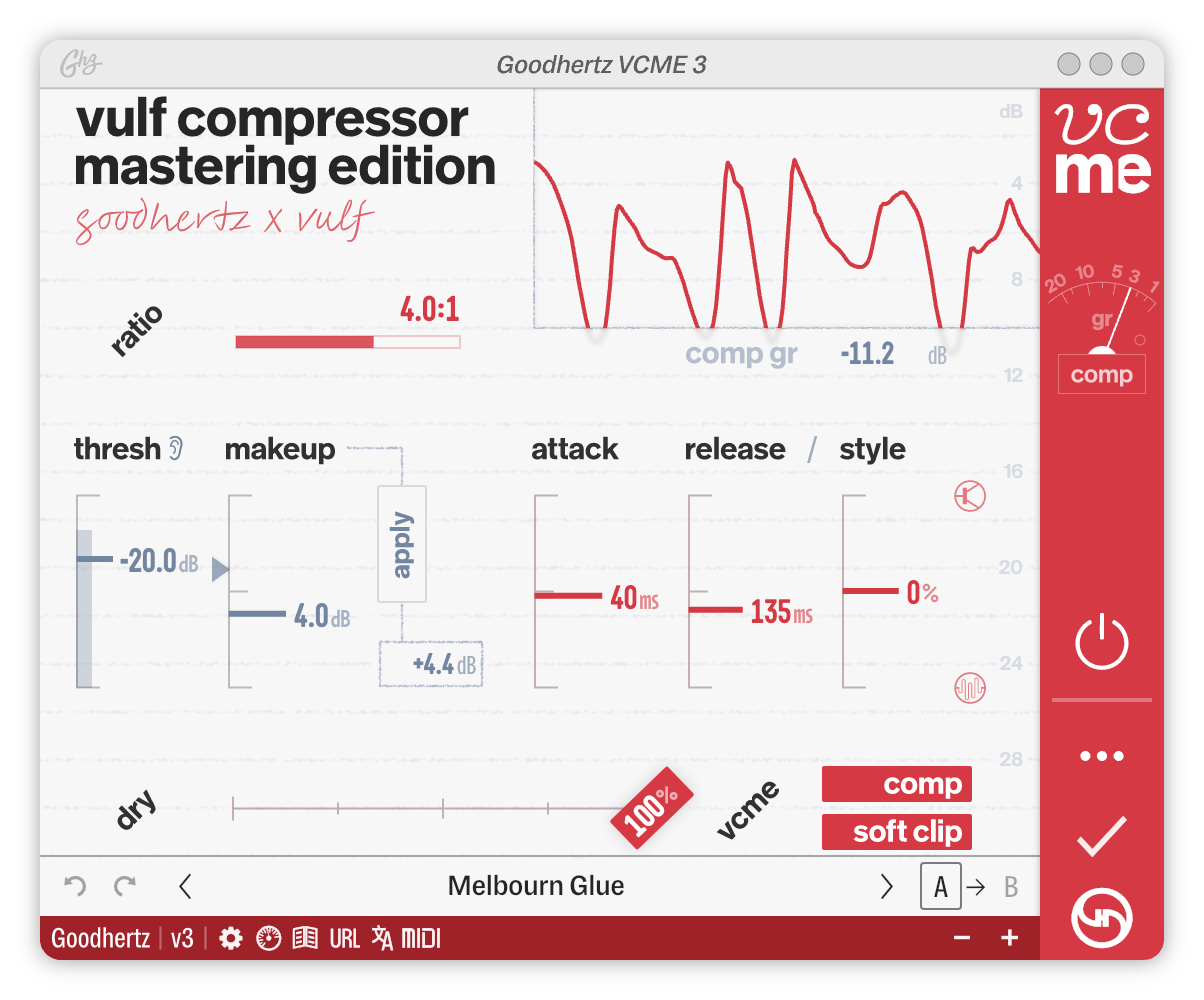
Here’s a screenshot of VCME in action. Click anywhere on the interface to jump to a control’s definition below.

Advanced Controls, Page 1

Advanced Controls, Page 2

Advanced Controls, Page 3

Controls

Primary Controls

Compression

Ratio

Controls the ratio of VCME’s compression.

This controls how much compression happens.

Higher ratios, like 10:1, mean more compression & gain reduction, lower values mean less. At 1:1, there is no compression at all.

Technically, a ratio of 10:1 means that for every 10 dB the input signal is above the Threshold, the output signal will only increase by 1 dB. Because VCME is a vari-mu design, though, the ratio is not set in stone and changes dynamically depending on the source.

  • Default 3.0:1

GR Meter Range

Changes the display range of the gain reduction meter.

  • Default 10 dB

Threshold

Sets the level (in dB) where compression begins.

This controls where the compression happens.

When the signal goes above the threshold, compression begins (this is the “attack” of the compressor). When the signal drops below the threshold, compression stops (this is the “release” of the compressor).

Threshold includes a level meter embedded in the slider. This meter shows the peak level of the input signal before VCME’s processing, which can be helpful when choosing a threshold.

If the signal peak exceeds or equals 0.0 dBFS, the meter color turns red.

Threshold also has a triangular indicator floating to the left side of the slider. This shows the threshold value where compression would begin, based on the peaks of the detector signal. When Threshold is set below these peaks, the triangle will disappear. If you see the triangle, it’s likely that no compression is occurring.

Together with the Ratio control, Threshold is, perhaps, the most important control in VCME. As you dig in further with the threshold, the compression algorithm adjusts, working harder and faster to control the gain. For this reason, it’s worth experimenting with different combinations of ratio & threshold (i.e. low threshold, low ratio vs higher threshold, higher ratio) to achieve the sound you want. Even if the gain reduction amounts are similar, the overall sound & dynamics can change dramatically for different ratio/threshold combos.

Lastly, don’t be afraid to set the threshold lower than you might in a typical compressor, sometimes 30 dB below signal peaks (or more). This is often where VCME does its best work :)

  • Default 0.0dB

Comp Listen

Allows you to monitor the parts of the signal that are being compressed and the gain reduction that is occuring. Some other compressor plugins call this control “Delta.”

Comp Listen can be very helpful for tailoring the attack & release times to your source material.

  • Default Off

Makeup Gain

Controls the compressor’s makeup gain.

This controls the output gain of the compressor to “make up” for the compressor’s gain reduction.

Setting the Makeup Gain correctly makes it much easier to A/B with or without compression and compare to the original uncompressed signal.

Makeup Gain has a triangular indicator floating to the left side of the slider. This triangle’s location is our best guess of where you should set Makeup Gain to match the perceived input & output levels. It may take a few seconds for this meter to “settle” — so give it a few seconds before trusting it completely.

  • Default 0.0dB

Apply

Sets Makeup Gain to the current value needed to level match the compressor’s input/output. Unlike a typical auto gain, this value depends on the actual measured loudness of the compressor input/output.

Options: Off, On

  • Default Off

Attack Time

Controls the speed of the compressor’s attack.

Attack Time has a big impact on transient sounds, especially drums & rhythmic material, and can be used to control their punch & overall timbre.

Smaller values, like 10 ms, allow the compressor to move very fast, quickly clamping down on transients. Larger values, like 250 ms, cause the compressor to work more slowly, letting the initial transients through before reacting.

While these values are provided in milliseconds, they should only be used as a rough guide since the attack speed is also impacted by the Ratio, Threshold, etc. In general, the higher the gain reduction, the faster VCME moves.

  • Default 50ms

Release Time

Controls the speed of the compressor’s release.

Like Attack Time, Release Time has a big impact on how VCME responds to transient sounds.

Smaller values, like 10 ms, allow the compressor to return to zero very fast, quickly releasing after transients. Larger values, like 250 ms, cause the compressor to release more slowly & smoothly, leading to less pumping and a more controlled, punchy sound.

As with Attack Time, these values are provided in milliseconds; however, they should only be used as a rough guide since the release speed is also impacted by the Ratio, Threshold, etc. In general, the higher the gain reduction, the faster VCME moves. One exception to this is the FET Release Style, which operates in a more fixed, obstinate way.

  • Default 250ms

Release Style

Changes the release characteristics of the compressor.

At -100%, the compressor release resembles an opto release, where the initial release occurs quickly, but the latter half of the release happens slowly.

At +100%, the compressor release resembles certain FET designs, where the compressor releases at a consistent rate throughout.

Release Style Technical Vibes
Opto -100% The higher the gain reduction, the faster the compressor moves when releasing Reactive, nimble, new school
FET +100% The gain reduction does not affect how fast the compressor moves when releasing Punchy, locked in, old school
Hybrid 0% An equal blend of FET & Opto Natural, balanced

Release Style is an advanced control and may be hard to hear depending on the source material and/or your personal level of ear training. To help hear what it does, we recommend used a transient source (like a drum loop) with exaggerated compression settings. We also recommend adjusting this last, while also tweaking the Release Time, since they are highly related.

  • Default 0%

Master Mix

Overall VCME mix.

0% is all dry signal and 100% is all VCME.

Setting Master Mix anywhere between 0% and 100% combines dry and compressed/limited signal — an easy way to do parallel compression/limiting.

  • Default 100%

Bypass

Compression On/Off

Turns On or Off VCME’s compression section.

Options: Off, On

  • Default On

Soft Clip On/Off

Turns On or Off VCME’s Soft Clip section.

Options: Off, On

  • Default On

VU Meter

VU Meter Mode

VU Meter Mode selects what is displayed in VCME’s sidebar VU meter.

Option About
LMTR

Limiter Gain Reduction (dB)

DRIVE

Drive / THD (%)

OUT

Output Level (VU)

COMP

Compressor Gain Reduction (dB)

  • Default COMP

VU Meter Ref Level

Sets the reference / calibration level for the VU meter’s OUT mode.

For example, a setting of -18 would mean that a -18 dBFS signal would read as 0 VU.

  • Default 0.0dBFS

Master On/Off

Bypasses VCME’s processing.

We recommend using the Master On/Off instead of your DAW’s plugin bypass to avoid digital artifacts.

  • Default On

Advanced Controls

The Advanced section offers more precise control and fine adjustment options.

To access VCME’s advanced controls, click the ••• icon in the sidebar.

Soft Clip

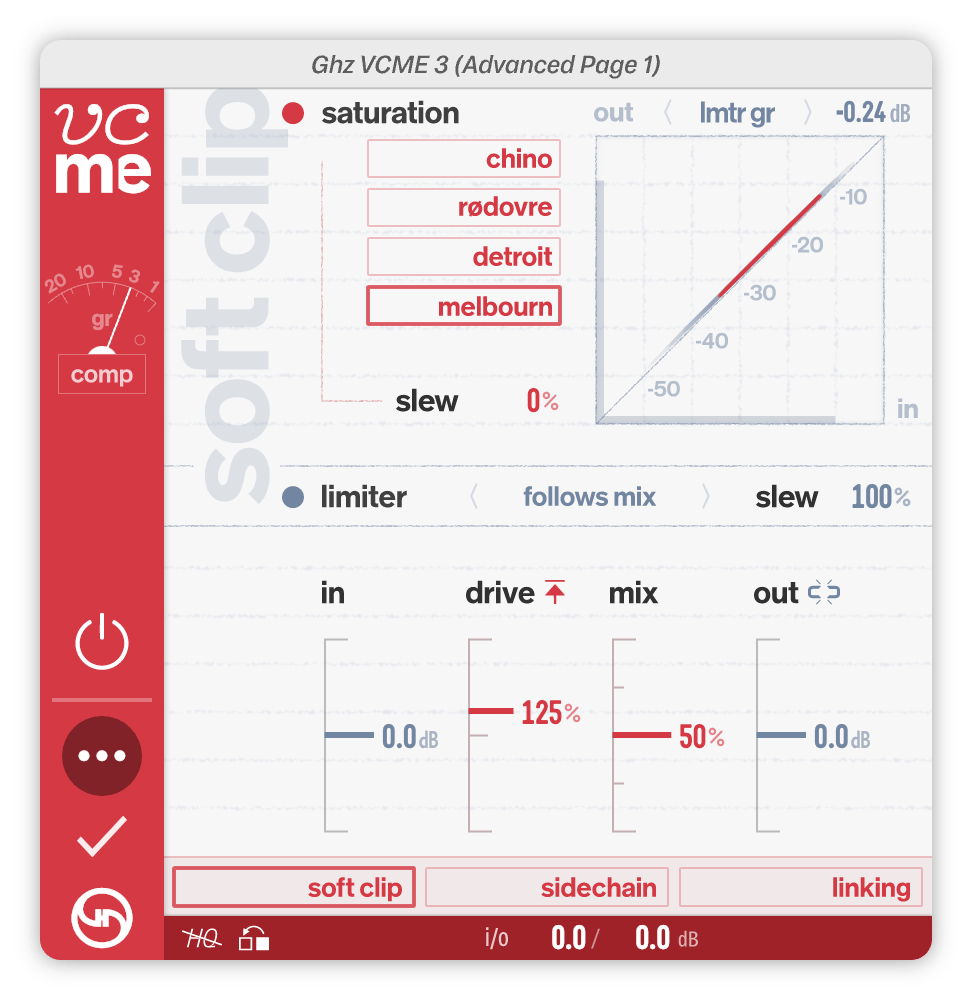
VCME’s Soft Clip section was created by examining and deconstructing several world-class analog mastering chains. Each of these chains featured different analog hardware, different A-to-D conversion, and different clipping and saturation characteristics.

The Soft Clip Saturation module captures the analog part of the chain: tubes, transformers, transistors, etc. all color the signal with subtle saturation, harmonics, and when pushed hard enough, full-on analog clipping & distortion. Using Soft Clip Mode, you can select between four different chains, each dominated by different hardware components with their own analog fingerprint.

The Soft Clip Limiter module captures the digital part: inspired by soft clipping A-to-D converters, it builds on this legacy but with a fundamentally new approach, separating transient and steady-state material to achieve punchier results with less distortion artifacts.

During the development of VCME, we found ourselves wanting to use the Soft Clip section independently, or in a different position than VCME’s Compression in the plugin chain. For that reason, we made a standalone VCME Soft Clip plugin that also adds a flexible Saturation Emphasis section for even greater harmonic shaping and control.

Soft Clip Saturation On/Off

Turns On or Off VCME’s analog saturation module.

Options: Off, On

VCME has two main processing blocks in the Soft Clip section: Saturation and Limiter.

  • Default On

Soft Clip Mode

Selects the analog saturation chain used by the Soft Clip section.

Options: Chino, Rødovre, Detroit, Melbourn

These chains were designed for mastering applications and will not color the linear frequency response in any way (i.e. they are completely flat in their linear operating range).

  • Chino: Hifi, classic tube sound, notes of Hendrix.
  • Rødovre: Round, tube-y, smooth.
  • Detroit: Grungy, warm, notes of Jamerson. Sousaphone-y.
  • Melbourn: Punchy & british. Strong transformer saturation.
  • Default Chino

Soft Clip Sat Slew

Soft Clip Sat Slew controls the slew rate of the saturation.

At 200%, the saturation responds slowly, leaving fast transients intact but reacting strongly to lower frequencies while adding strong bass harmonics. This produces a smooth, rounder sound.

At 0%, the saturation responds extremely quickly, reacting more strongly to higher frequency content. This leads to extended high frequency harmonics and treble excitement. This produces a brighter, sharper sound and more obvious distortion.

  • Default 100%

Soft Clip Readout

Soft Clip Readout selects what is displayed in the Soft Clip numeric readout.

Option About
LMTR GR

Max Limiter Gain Reduction

LUFS (LT)

Long Term LUFS

LRA

Loudness Range

  • Default LMTR GR

Soft Clip Limiter On/Off

Turns On or Off VCME’s Limiter section.

Options: Off, On

  • Default On

Soft Clip Limiter Brickwall

Determines how the limiter is affected by Soft Clip Mix.

Options: Follows Mix, Brickwall

When set to Follows Mix, the limiter mix follows the setting of Soft Clip Mix, where 100% means the limiter is fully mixed in without any dry signal. At Soft Clip Mix settings < 100%, the limiter is NOT guaranteed to prevent clipping or digital overs.

When set to Brickwall, the limiter mix follows the setting of Soft Clip Mix for quieter signals, but as the signal level gets closer to clipping, the limiter mix increases to 100%. In this mode, the limiter is guaranteed to always prevent clipping and digital overs, regardless of the Soft Clip Mix setting.

  • Default Brickwall

Soft Clip Limiter Slew

Soft Clip Limiter Slew controls the slew rate of the limiter.

This control behaves similarly to Soft Clip Sat Slew.

At 200%, the limiter responds slowly while clamping down quickly when needed. This produces a clean and punchy sound, but with less sharp transients.

At 0%, the limiter responds extremely quickly, more like the classic soft clipper in certain mastering A-to-D converters. This setting can produce obvious distortion when pushed, but when used sparingly, it provides extra gain enhancement with minimal reduction in transient content.

100% is a nice middle ground and is our recommend starting place.

  • Default 100%

Soft Clip Input

Adjusts the input level of the Soft Clip section.

  • Default 0.0dB

Soft Clip Drive

Controls the gain and overall clipping characteristics of the Soft Clip section.

0% is clean & sharp: no analog saturation, and the limiter acts only on the highest peaks above -3 dBFS.

100% is true-to-life: closely mimicking what you might get with an analog mastering device when pushed hard. The limiter knee is fairly soft and provides a good balance between soft/hard clipping.

200% is extreme saturation and distortion, almost fuzz-like. This setting adds extreme amounts of gain (more than 40 dB) with extended harmonics. The limiter knee is the softest at this setting, producing tape-like soft clipping. We recommend using HQ Mode when pushing Soft Clip Drive hard.

  • Default 100%

Soft Clip Gain Comp

Controls the gain compensation behavior of the soft clipper.

Option Symbol
Auto

Manual

“When set to Auto, the gain increases as Soft Clip Drive increases to compensate for any losses caused by the soft clipper.

When set to Manual, no gain compensation is applied and the soft clipper is only allowed to reduce the gain.

  • Default Auto

Soft Clip Mix

Blends the clean, dry signal with the Soft Clip signal.

  • Default 100%

Soft Clip Output

Adjust the output level of Soft Clip section, post-limiter.

  • Default 0.0dB

Sidechain

Sidechain Filter On/Off

Turns On or Off VCME’s Sidechain Filter section.

  • Default On

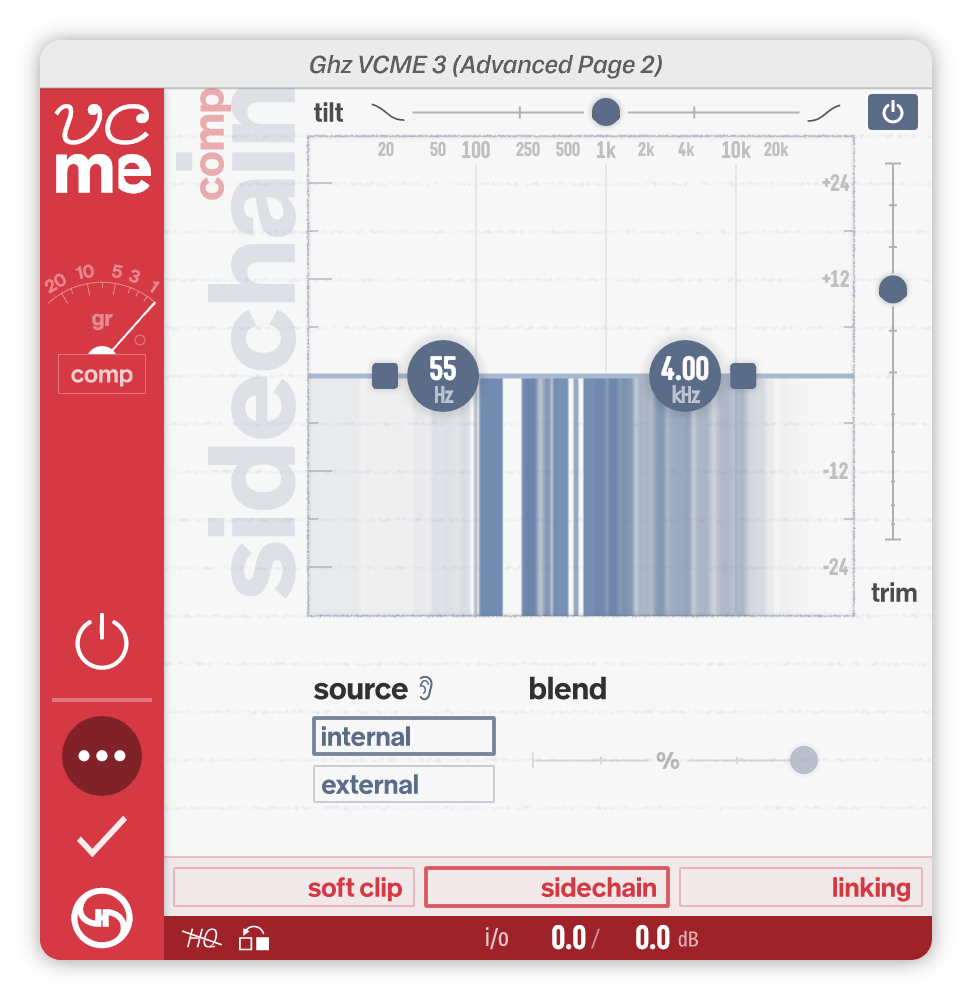
Sidechain Tilt

Adjusts the spectral tilt of the signal being fed into the sidechain detector.

Negative values increase bass content in the sidechain, resulting in increased compression sensitivity to bass frequencies.

Positive values reduce bass content in the sidechain, resulting in decreased compression sensitivity to bass frequencies.

This control can be viewed a global spectral correction tool, ensuring that the sidechain signal best represents the frequency content you want to compress.

In a mastering context, Sidechain Tilt often enables you to compress earlier in the signal chain, where corrective EQ may not have been fully applied yet.

For mixing, Sidechain Tilt allows you to tailor the compression’s frequency sensitivity to the natural spectral tilt of the instrument or source. For example, a bass guitar naturally has a strong spectral falloff, often leading to overly compressed low frequencies. By bumping up the spectral tilt +12 dB, you can get a much more open, unrestrained sound.

Listen to the detector signal with Sidechain Listen in order to fine tune the Sidechain Filtering.

  • Default 0.0dB

Sidechain Freq Low

Controls the corner frequency of the low filter.

  • Default 125Hz

Sidechain Resonance Low

Controls the amount of filter resonance at the Sidechain Freq Low frequency.

  • Default 0.0dB

Sidechain Slope Low

Continuously varies the slope of the low filter.

Positive values create a low shelf boost. Negative values begin as a low shelf cut and eventually morph into a pure low cut.

  • Default 0%

Sidechain Freq High

Controls the corner frequency of the high filter.

  • Default 4.00kHz

Sidechain Resonance High

Controls the amount of filter resonance at the Sidechain Freq High frequency.

  • Default 0.0dB

Sidechain Slope High

Continuously varies the slope of the high filter.

Positive values create a high shelf boost. Negative values begin as a high shelf cut and eventually morph into a pure high cut.

  • Default 0%

Sidechain Scale

Changes the display scaling of the filter section.

  • Default +-30 dB

Sidechain Trim

Adjusts the level of the sidechain detector signal, pre-threshold.

  • Default 0.0dB

Sidechain Source

Selects the source of the detector signal used by the compressor, also known as a sidechain or key input.

Option Discussion
Internal

Internal detector signal (i.e. normal compression)

External

External detector signal (i.e. sidechain compression)

By default, the compressor “listens” its own input signal to determine how much it should compress that same signal.

Using Sidechain Source, you can select a different source to listen to. This is often called “sidechaining” — where the dynamics of one signal are used to compress another signal.

To route audio to VCME’s external input, use the host/DAW’s built-in sidechain selection method.

  • Default Internal

Sidechain Listen

Allows you to monitor / listen to the detector signal directly.

This is what VCME’s compressor is “listening” to.

  • Default Off

Sidechain Blend

Controls how much of the detector signal comes from the external sidechain input.

100% is fully external.

50% is an equal blend of external and internal.

0% is fully internal.

  • Default 100%

Linking

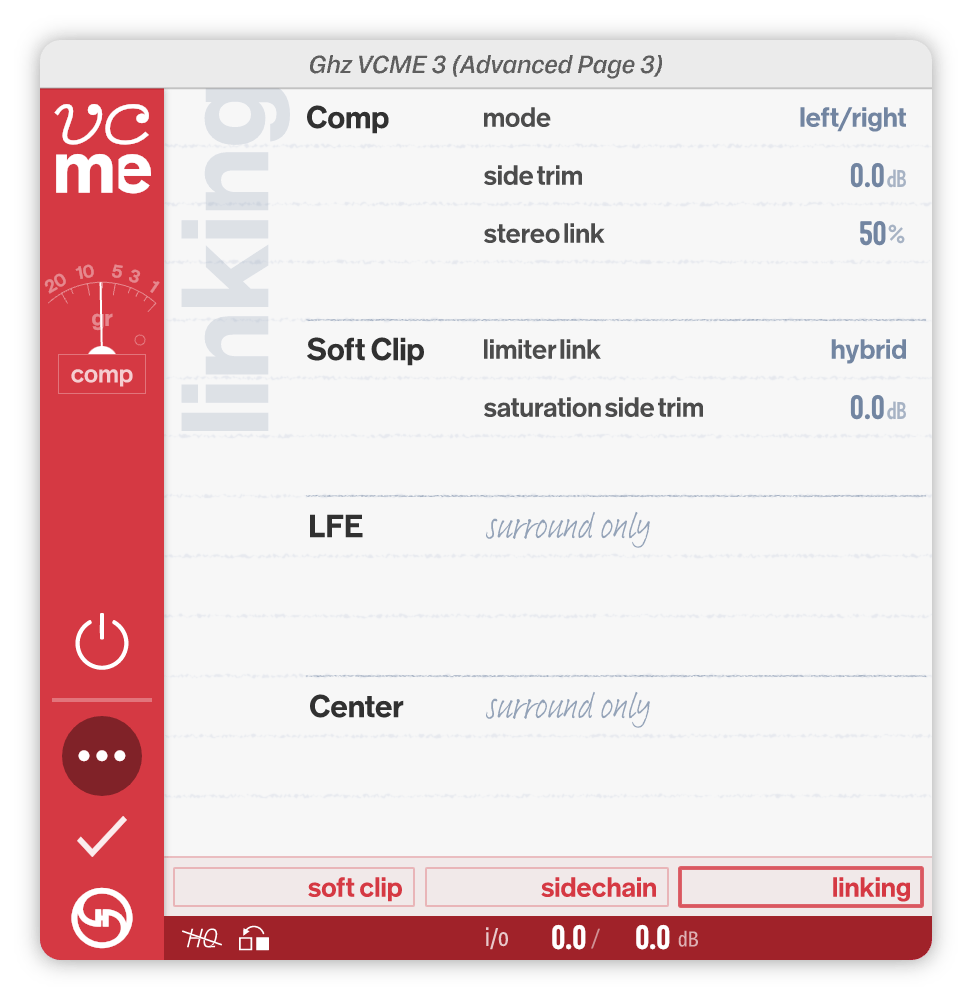
Comp Link Mode

For stereo operation only, Comp Link Mode controls the type of stereo linking used by the compressor’s detector.

Option Discussion
Left/Right

Left & Right channels are linked together

Mid/Side

The Mid & Side signals are linked together

  • Default Left/Right

Comp Link Side Gain

For stereo operation only, Comp Link Side Gain alters the gain of the M/S “side” signal as seen by the compressor detector.

Comp Link Side Gain only affects the detector signal, not the actual audio signal.

Comp Link Side Gain is active even when Comp Link Mode is set to Left/Right.

  • Default 0.0dB

Comp Link Stereo

For stereo operation only, Comp Link Stereo controls the strength of the stereo linking. Higher Comp Link Stereo values cause the gain reduction to be more similar between left/right (or mid/side) channels. At 100%, the same gain reduction is applied to all channels.

The Comp Link Stereo is useful for controlling how the compressor responds to stereo signals, and it can have a big impact on the stereo image of the output.

  • Default 50%

Comp Link Left/Right

Controls the strength of the left/right linking in surround formats. Higher Comp Link Left/Right values cause the gain reduction to be more similar between left/right pairs (e.g. Front Left / Front Right). At 100%, the same gain reduction is applied to all left/right pairs.

  • Default 0%

Comp Link Front/Back

Controls the strength of the front/back linking in surround formats. Higher Comp Link Front/Back values cause the gain reduction to be more similar between front/back channels. At 100%, the same gain reduction is applied to all front/back channels.

  • Default 0%

Soft Clip Link Side Gain

For stereo operation only, Soft Clip Link Side Gain alters the gain of the M/S “side” signal as seen by the soft clipper.

Soft Clip Link Side Gain only affects the detector signal, not the actual audio signal.

  • Default 0.0dB

LFE Link Amount

Controls the strength of the LFE linking in surround formats.

LFE Link Amount applies to both Compression linking and Soft Clip linking.

  • Default 0%

LFE Link Trim

Adjusts the level of the LFE channel(s) of the detector signal.

LFE Link Trim only affects the detector signal, not the actual audio signal.

  • Default 0.0dB

Center Link Amount

Controls the strength of the center linking in surround formats.

Center Link Amount applies to both Compression linking and Soft Clip linking.

  • Default 0%

Center Link Trim

Adjusts the level of the center channel(s) of the detector signal.

Center Link Trim only affects the detector signal, not the actual audio signal.

  • Default 0.0dB

Adv Page

Selects which Advanced Page is displayed.

Options: Soft Clip, Sidechain, Linking

This control affects the display only (not the sound).

  • Default Soft Clip

HQ Mode

HQ Mode is our no-holds-barred processing mode where super high quality audio is given priority over CPU usage.

When HQ Mode is turned On, VCME uses a higher precision algorithm, providing better spectral resolution at the expense of some added latency (~50 ms) and higher CPU usage.

Option Symbol
Off

On

We recommend using HQ Mode when you need the highest possible quality and don’t mind 2-4x higher CPU usage. An important lead instrument, vocal, or a mastering session is a great place for HQ Mode.

HQ Mode cannot be MIDI mapped since automating it is not recommended.

HQ Mode will require more CPU resources and result in a slightly higher processing delay (latency). To ensure proper delay compensation in your host/DAW, automating HQ Mode is not recommended.

  • Default Off

Reset Meters

Resets the meter processing. This resets all the metering values across the plugin.

Options: Off, On

  • Default Off

Preprocess Input Gain

Controls the input gain before it hits VCME’s processing.

  • Default 0.0

Postprocess Output Gain

Controls the output gain after VCME’s processing.

  • Default 0.0

Specs

Supported Channel Configurations

Input Channel # Output Channel #
Mono Mono
Stereo Stereo
LCR LCR
LCRS LCRS
Quadraphonic Quadraphonic
5.0 (Surround) 5.0 (Surround)
5.1 (Surround) 5.1 (Surround)
5.1.2 (Surround) 5.1.2 (Surround)
5.1.4 (Surround) 5.1.4 (Surround)
6.0 (Surround) 6.0 (Surround)
6.1 (Surround) 6.1 (Surround)
7.0 (Surround) 7.0 (Surround)
7.0 SDDS (Surround) 7.0 SDDS (Surround)
7.0.2 (Surround) 7.0.2 (Surround)
7.0.4 (Surround) 7.0.4 (Surround)
7.0.6 (Surround) 7.0.6 (Surround)
7.1 (Surround) 7.1 (Surround)
7.1 SDDS (Surround) 7.1 SDDS (Surround)
7.1.2 (Surround) 7.1.2 (Surround)
7.1.4 (Surround) 7.1.4 (Surround)
7.1.6 (Surround) 7.1.6 (Surround)
9.0.4 (Surround) 9.0.4 (Surround)
9.0.6 (Surround) 9.0.6 (Surround)
9.1.4 (Surround) 9.1.4 (Surround)
9.1.6 (Surround) 9.1.6 (Surround)

Acknowledgements

Annlie Huang / Avedis Kifedjian / Blake Mills / Boris Sass / Chris Conover / Diana Zheng / Jack Stratton / Justin Horstmann / Luke Smith / Matthew Wang / Philip Weinrobe / Rupert Neve / Stephan Wunderlich / TaeHo Park

Authors

Devin Kerr / Rob Stenson / Jasper Duba / Noah Dayan

Translators

TaeHo Park / Tiago Frúgoli / Gustavo Guzmán / Reda Kermach / Noah Dayan / Gal Cohen / Sydney Bolton / Enrico Cirene

About Goodhertz Plugins

User Interface

Goodhertz plugins are made to be workhorse tools that sound amazing. We’ve put a lot of thought and care into the audio quality and plugin usability, and for that reason, we’ve opted for simple and direct controls & interfaces that don’t rely on photorealistic knobs or ornamental screw heads to communicate their meaning.

We’ve also decided to only include meters and graphs when we feel they will directly lead to a better sonic result. Meters/graphs can consume significant CPU resources, and we firmly believe that if it sounds good, it is good.

Our meters can be reset at any time using the “Reset Meters” button (in certain plugins) and manually enabled or disabled via the “Enable Metering” User Preference.

Preset Bar

Button Action
Undo the last parameter change.
Redo the last parameter change.
Switch to the previous preset.
“Preset Name” Opens the preset drawer (Option/Alt + Click to reset all plugin settings to preset).
Switch to the next preset.
Selects the A settings state.
This copies the current settings to the opposite A/B state; i.e. if you’re on the A state, clicking the arrow will copy those settings to the B state.
Selects the B settings state.

Toolbar

Introduced in version 3.10, the toolbar at the bottom of the plugin holds a handful of shortcut buttons.

Icon Action
Opens preferences menu
Shows diagnostic information
Opens plugin manual in your default web browser
Opens a URL representation of the current plugin control state (Command/Ctrl + Click to copy the URL to the clipboard)
Opens language-selection menu
Opens MIDI Learn menu
Toggles HQ mode (only in certain plugins)
Resets all meters (only in certain plugins)
Shrink interface
Enlarge interface

Keyboard Shortcuts

Action Keyboard Shortcut
Enter New Parameter Value Once you’ve clicked or double-clicked a control, type in a value, then hit Enter, Return, or Tab. Depending on the control type, we support a variety of input values, such as fractions (e.g. 1/4 for 0.25), the kilo suffix (e.g. 4k for 4000), note values for time-based controls (e.g. 1/8T for an eighth note triplet or 1/4D for a dotted quarter note, relative to the current DAW or plugin BPM), and musical notes for frequency controls (e.g. A#5 for 923.33 Hz or Eb2 for 77.78 Hz).
Increment Parameter Value or arrow keys
Decrement Parameter Value or arrow keys
Jump to Next Parameter Tab
Jump to Previous Parameter Shift + Tab or ` (backtick)
Escape Parameter Focus / Close any Open Drawers Esc
Tap Tempo t or Click (N.B. For this to work, you must have a BPM or milliseconds control selected.)
Save Preset n (N.B. For this to work, the preset panel must be open.)
Set Preset as Favorite f (N.B. For this to work, the preset panel must be open.)
Edit Preset e (N.B. For this to work, the preset panel must be open.)
Update Preset u (N.B. For this to work, the preset panel must be open.)
Delete Preset Delete (N.B. For this to work, the preset panel must be open.)

Right-Click Actions

Action Instruction
Read about Control in manual Right-Click & select “Show in Plugin Manual”
Reset Control to Default Right-Click & select “Reset to Factory Default Value”
Lock Control when switching presets Right-Click & select “Lock When Switching Presets”
Copy current plugin settings to clipboard Right-Click & select “Copy as URL to Clipboard”
Paste all plugin settings from clipboard Right-Click & select “Paste From Clipboard”
Reset all plugin settings to Defaults Right-Click & select “Reset All to Defaults”
Reset all plugin metering Right-Click & select “Reset Meters” (only available in certain plugins)
Reset all plugin settings to Preset Right-Click & select “Reset to [preset] Preset”
Update Preset with current plugin settings Right-Click & select “Update [preset] Preset”
Create new Preset with current plugin settings Right-Click & select “Create New Preset”
Go to the plugin’s manual page Right-Click & select “Read [plugin name] Manual”

Right-Click Preferences

Action Explanation
Language Switch the display language of text elements in Goodhertz plugins. We currently support the following languages: English, Spanish, Portuguese, French, Italian, Japanese, Korean, Chinese (Simplified), Chinese (Traditional), and Arabic.
Always Open Advanced Pane By default, this is Off — i.e. when the plugins open, they do not show you the advanced controls available by hitting the ••• button in the sidebar. If you’d like to always see the advanced controls, enable this preference.
Control Granularity By default, all Goodhertz controls move in small increments when dragged. If you prefer controls to operate with larger increments by default, change this option to Coarse. N.B. This will swap the behavior of the Shift mouse modifier - i.e. Shift-dragging will move a control with standard granularity when set to Coarse.
Dark Mode Allows you to choose the color palette used for displaying the interface. If you prefer the look of dark colors (or work in a darker environment) enable this option. The Auto option will automatically adjust the color scheme depending on the system preferences of your machine (Mac only).
Enable Hover Markers By default, this is On — i.e. all controls will show markers on hover. If you find this behavior unnecessary, deselect this option and no markers will be shown.
Enable Metering By default, this is On — i.e. in normal operation, all audio meters and visualizations available in Goodhertz plugins are enabled and running. If you’d like to turn them off and disable all metering and visualization, deselect this option. And to turn them back on, simply reselect it. N.B. If you’re struggling to use a large number of Goodhertz plugins on an older processor with an integrated GPU, sometimes disabling metering can help.
Enable Scroll Input By default, all Goodhertz sliders can be scrolled in addition to dragged. If you find this behavior unnecessary, deselect this option and no scrolling events will be used to control Goodhertz sliders.
Enable Tooltips By default, this is On — i.e. all controls will show a tooltip on hover. If you find this behavior unnecessary, deselect this option and no tooltips will be shown.
GPU Acceleration By default, this is Enabled — i.e. the GPU will be prioritized whenever possible to improve graphics performance. If your graphics card does not support GPU acceleration, this preference will be automatically set to Reduced. N.B. If you experience graphics issues, disabling this preference may help.
Keyboard Focus By default, you can get keyboard focus on any Goodhertz control with a single click. Change this option to ensure keyboard focus only occurs on double clicks.
Window Size Enlarge or shrink the Goodhertz plugin window by selecting an option here. This will save your preference for all instances of this plugin.
Diagnostics Displays general information about the plugin and the configuration of your system for diagnostic purposes. If you experience any issues with the plugin, it can be helpful to include this information when contacting us. N.B. Clicking this window will copy the contents to the clipboard.
MIDI Learn Configure the mapping used to control parameters via MIDI messages. To assign a MIDI number to a control, enable MIDI Learn and send a MIDI message while a control is focused. To remove an assigned mapping, click on a mapping entry in the list or select Clear All to reset the entire mapping. N.B. You can assign different types of MIDI messages including Pitch Bend, Note, and CC messages.

Mouse Modifiers

Action Combination (Mac) Combination (Windows)
Reset Parameter to Default Value Option + Click Alt + Click
Move Control with Coarse Precision Shift + Drag Shift + Drag
Move Control with Fine Precision Command + Drag Ctrl + Drag
Move Control with Normal Precision Drag Drag

Automation

Unintentional digital clicks and pops are the worst. They happen for lots of reasons and often end up wasting your time with needless revisions or mastering surgery. When they go unnoticed, they can make their way onto commercial albums and releases.

Plugin automation is a common cause of clicks and pops. Sweeping an EQ band, changing a delay setting, and even automating a plugin bypass can cause digital artifacts if poorly handled.

This is not true for Goodhertz plugins. Any parameter in a Goodhertz plugin, even on/off switches, can be automated freely and smoothly without clicks, pops, or zipper noises (unless otherwise noted). You can push them, pull them, LFO them — whatever you do, they’ll handle it gracefully.

Since our Master On/Off controls won’t create artifacts, we recommend that you use them rather than your DAW-supplied plugin bypass if you want to disable plugin processing.

Plugin Settings

Goodhertz plugin settings can be copied and pasted as text urls, which look like this: https://goodhertz.com/vulf-comp/3.0.9?cm=0&wf=0&lf=100&lfc=50

To copy and paste, right click anywhere on the plugin interface and select either the copy or the paste option.

E.g. If you paste “https://goodhertz.com/vulf-comp/3.0.9?cm=0&wf=0&lf=100&lfc=50” into Vulf Compressor it will recall the settings associated with that url. This way you can easily send an exact plugin setting to someone — in an email or a text — without any guesswork or screenshots.

System Requirements

Mac OS X ≥ 10.13

Audio Unit 64-Bit, VST 64-Bit, VST3 64-Bit, or AAX 64-Bit host

Windows ≥ 10

VST 64-Bit, VST3 64-Bit, or AAX 64-Bit host

Contact Support

To send plugin feedback, please e-mail us at feedback@goodhertz.com.

If you’re having trouble, experiencing a technical issue, or you think you’ve found a bug, please email support@goodhertz.com.

Find all our contact info & bug-reporting protocol on the contact page.