Panpot

New directions in panning

Panpot brings together four different modes of panning in a single plugin that will transform the way you think about stereo. Because Panpot is so different from the panner you probably used before, it’s worth learning a little bit about how it works and where it came from.

Interface Preview

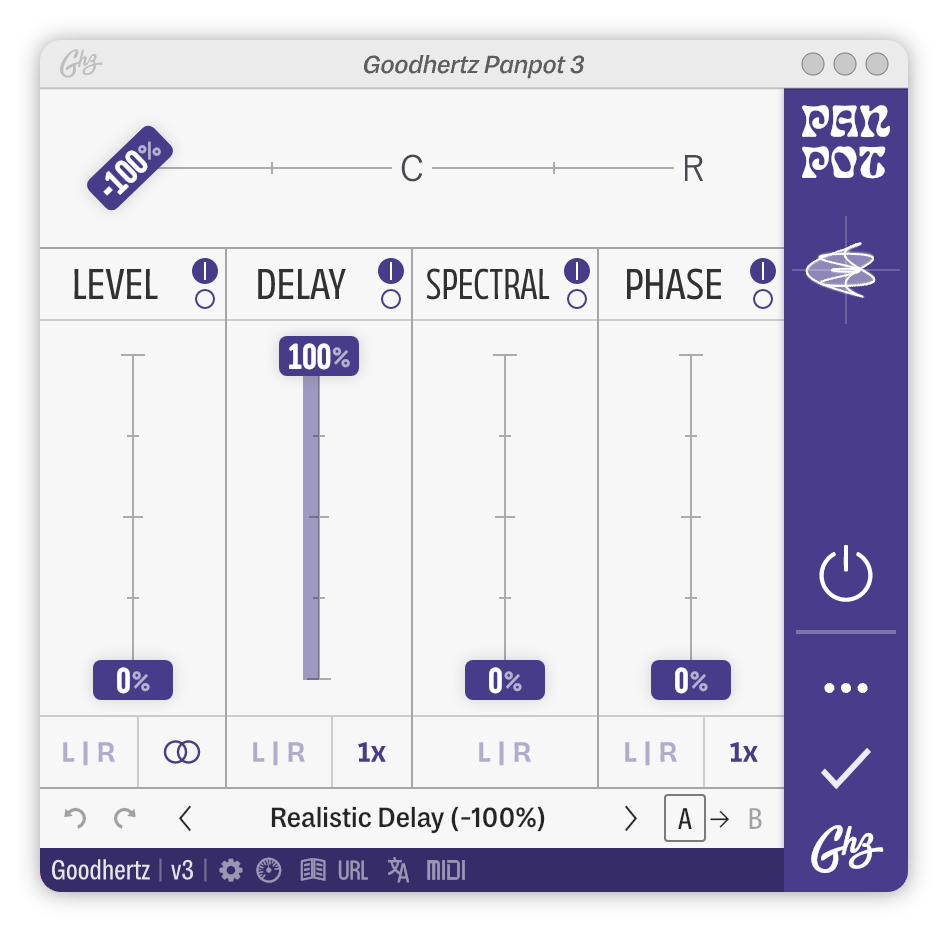
Here’s a screenshot of Panpot in action. Click anywhere on the interface to jump to a control’s definition below.

Advanced Controls

Background

There are a few different auditory cues that enable humans to hear spatially — that is, to identify the size, location, and distance of a sound in space. These cues fall into four main categories: Level Differences, Time Differences, Spectral Cues, and Distance Effects.

The traditional audio level panner — the one found on almost every audio console since the 1970’s — gives an engineer control of only one of these cues: level differences. Level panning works well enough for some things, but it often falls short, forcing us to rely on other tools (like delays, reverbs, stereo widening, EQ, …) to achieve more depth and definition in the stereo field.

You can think of level panning as panning in black & white; while you can convey some sense of light and dark, you don’t have access to the same depth, nuance, and range that you would if you were working in color. Panpot gives you the full color spectrum for stereo audio cues. You can choose to use it however you like: for realistic, hyper-realistic, or totally unrealistic spatial effects — Panpot gives you four different panning “colors,” but we don’t tell you what to paint.

Controls

Primary Controls

Master Pan

Controls the overall pan position.

Panpot’s four panning modules (Level, Delay, Spectral, & Phase) are all controlled with a single Master Pan control.

At 0%, Panpot’s panning modules won’t do anything; it’s not until you move the Master Pan away from 0% that the individual modules begin to act.

  • Min -100%
  • Max 100%
  • Default 0%

Level Pan Module

The Level Pan module acts like a traditional pan knob: altering the left/right balance more as you pan away from center.

Level Pan On/Off

Turns On or Off the level panning module.

  • Default On

Level Pan Amt

Controls the amount of level panning (based on the position of the Master Pan).

Allows the level panning to be varied from fully On (at 100%) to fully Off (at 0%).

  • Min 0%
  • Max 100%
  • Default 100%

Level Pan Flip

Flips the panning direction for the Level Pan Module only.

Options: L | R, R | L

For example, Master Pan of -100% [hard left] would become 100% [hard right].

  • Default L | R

Level Pan Mode

Switches between two different Level Pan modes: Stereo and Dual Mono.

Option Symbol Discussion
Stereo

Level Pan acts as typical stereo balance pan: as the level of one channel increases, the other decreases

Dual Mono

Level Pan acts as if there were two mono panners: one for left and one for right

When set to Dual Mono, the Level Pan acts as if there were two mono panners: one for left and one for right.

At a Master Pan of -100% [hard left], the right channel is panned completely to left — collapsing the stereo image to the left.

At a Master Pan of 100% [hard right], the left channel is panned completely to right.

  • Default Stereo

Delay Pan Module

The Delay panning module creates a strong sense of sidedness without altering the stereo level balance by using small time delays (less than ~0.7 ms at 1x) that closely model human hearing delays.

Tips for using Delay panning
  • The Delay pan generally enhances the depth & width of a stereo image. Use it when you want something to sound more three-dimensional.
  • Use Delay panning when you want to move an element out of the center of the mix without making it feel overly hard-panned.
  • Delay Pan + Spectral Pan produces very lifelike panning results.
  • Delay panning can sound almost like double tracking, particularly with higher Delay Pan Mult values.

Delay Pan On/Off

Turns On or Off the delay panning module.

  • Default On

Delay Pan Amt

Controls the amount of delay panning (based on the position of the Master Pan).

  • Min 0%
  • Max 100%
  • Default 0%

Delay Pan Flip

Flips the panning direction for the Delay Pan only.

Options: L | R, R | L

For example, Master Pan of -100% [hard left] would become 100% [hard right].

  • Default L | R

Delay Pan Mult

Scales the delay amount by a multiplier.

Multiplier Notes Max Delay
1x

Lifelike

~0.7 ms

2x

Less lifelike

~1.4 ms

4x

Even less lifelike

~2.8 ms

8x

Not very lifelike

~5.6 ms

16x

Definitely not lifelike

~11.2 ms

32x

Unrealistic

  • Default 1x

Spectral Pan Module

Panpot’s Spectral panning works by changing the timbre of the stereo image, focusing higher frequency sounds toward the pan direction. The Spectral algorithm mimics the type of head shadowing that occurs in nature and can sound hard-panned without feeling ungrounded or off-kilter in the low end.

Tips for using Spectral panning
  • Spectral panning can sound very focused and directional (especially if the source has a decent amount of high end), yet natural.
  • Use Spectral panning when you want to position an element in the stereo field while keeping the bass centered and retaining a solid mono image.

Spectral Pan On/Off

Turns On or Off the spectral panning module.

  • Default On

Spectral Pan Amt

Controls the amount of spectral panning (based on the position of the Master Pan).

  • Min 0%
  • Max 100%
  • Default 0%

Spectral Pan Flip

Flips the panning direction for the Spectral Pan only.

Options: L | R, R | L

For example, Master Pan of -100% [hard left] would become 100% [hard right].
  • Default L | R

Phase Pan Module

The most unusual panning type: Panpot’s Phase module creates a constant phase shift between the left and right channels. Similar to Delay panning, Phase panning does not alter the stereo level balance but instead alters the arrival times of the left/right channels.

Tips for using Phase panning
  • Like the Delay Pan, Phase panning can help move elements out of the center of a mix, decluttering the mono image and creating a more expansive sound field.
  • At 1x, phase panning is highly mono-compatible — useful for producing a bigger, wider stereo image without sacrificing the center.
  • You can use the phase pan almost like a stereo widener. Though it will still lean sounds toward the pan direction, it has the least defined panning position of the four Panpot modules — great for making mix elements sound more diffuse and less focused.

Phase Pan On/Off

Turns On or Off the phase panning module.

  • Default On

Phase Pan Amt

Controls the amount of phase panning (based on the position of the Master Pan).

  • Min 0%
  • Max 100%
  • Default 0%

Phase Pan Flip

Flips the panning direction for the Phase Pan only.

Options: L | R, R | L

For example, Master Pan of -100% [hard left] would become 100% [hard right].
  • Default L | R

Phase Pan Mult

Multiplies the phase shift amount.

Option About Discussion
1x

Mono compatible

90°

2x

Not mono compatible

180°

  • Default 1x

Master On/Off

Bypasses Panpot’s processing.

We recommend using the Master On/Off instead of your DAW’s plugin bypass to avoid digital artifacts.

  • Default On

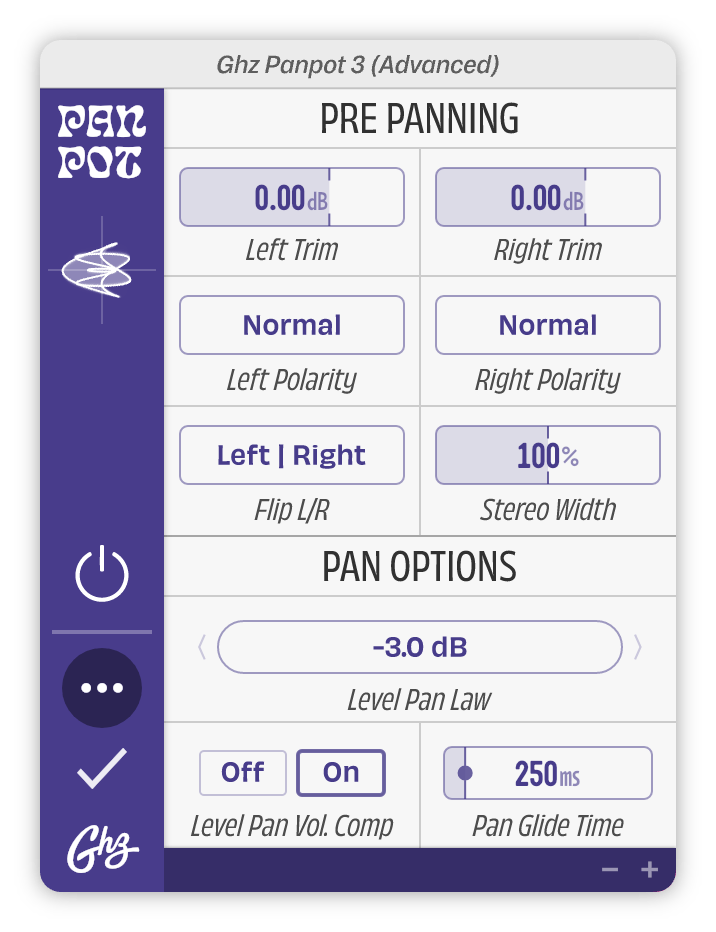
Advanced Controls

The Advanced section offers more precise control and fine adjustment options.

To access Panpot’s advanced controls, click the ••• icon in the sidebar.

Pre Panning

Left Trim

Enables left channel gain trimming before panning occurs.

This can be useful to balance (or offset) a stereo source before the panning processing.

  • Min -24.00dB
  • Max 12.00dB
  • Default 0.00dB

Right Trim

Enables right channel gain trimming before panning occurs.

  • Min -24.00dB
  • Max 12.00dB
  • Default 0.00dB

Left Polarity

Flips the polarity of the left channel.

Options: Normal, Inverted

  • Default Normal

Right Polarity

Flips the polarity of the right channel.

Options: Normal, Inverted

  • Default Normal

Flip L/R

Swaps the left and right channels such that right becomes left, and left becomes right.

Options: Left | Right, Right | Left

  • Default Left | Right

Stereo Width

Changes the width of the stereo field.

  • Increasing the Stereo Width widens the stereo field, emphasizing elements that are in the sides or outer parts of the mix.
  • Decreasing the Stereo Width narrows the stereo field, emphasizing elements that are in the center of the mix.
  • At exactly 100%, the stereo field is unchanged.
  • Min 0%
  • Max 200%
  • Default 100%

Pan Options

Level Pan Law

Enables the selection of alternate pan laws for the Level Pan Module.

Option Discussion
Stereo Balancer

Typically used on stereo mixer channels.

-2.5 dB

Used in older versions of Pro Tools

-3.0 dB

The most common pan law — works well in most situations.

-4.5 dB

The pan law often associated with SSL consoles.

-6.0 dB

Occasionally used in mono-critical situations.

  • Default -3.0 dB

Level Pan Vol Comp

Provides Level Pan volume compensation such that there will be no level drop when Master Pan is panned center.

Options: Off, On

  • Default On

Pan Glide Time

Controls how long it takes the Master Pan to travel from hard left -100% to hard right 100%.

Pan Glide Time can be set via tap tempo. Use the T key when the control is highlighted to tap in your desired tempo.

Clicks and pops may result at extremely fast pan glide times (like 10ms).

  • Min 10ms
  • Max 2.500s
  • Default 250ms

Specs

Supported Channel Configurations

Input Channel # Output Channel #
1 2
2 2

Acknowledgements

Alan Blumlein / Annlie Huang / Chris Conover / Diana Zheng / Don Gunn / Ewan Macpherson / Georg Essl / Jack Stratton / Jake Birch / Jason Corey / Jon Visger / Ollie Hammett / TaeHo Park / Tyler Duncan

Authors

Devin Kerr / Rob Stenson / Jasper Duba / Noah Dayan

Translators

TaeHo Park / Tiago Frúgoli / Gustavo Guzmán / Reda Kermach / Noah Dayan / Gal Cohen / Sydney Bolton / Enrico Cirene

About Goodhertz Plugins

User Interface

Goodhertz plugins are made to be workhorse tools that sound amazing. We’ve put a lot of thought and care into the audio quality and plugin usability, and for that reason, we’ve opted for simple and direct controls & interfaces that don’t rely on photorealistic knobs or ornamental screw heads to communicate their meaning.

We’ve also decided to only include meters and graphs when we feel they will directly lead to a better sonic result. Meters/graphs can consume significant CPU resources, and we firmly believe that if it sounds good, it is good.

Our meters can be reset at any time using the “Reset Meters” button (in certain plugins) and manually enabled or disabled via the “Enable Metering” User Preference.

Preset Bar

Button Action
Undo the last parameter change.
Redo the last parameter change.
Switch to the previous preset.
“Preset Name” Opens the preset drawer (Option/Alt + Click to reset all plugin settings to preset).
Switch to the next preset.
Selects the A settings state.
This copies the current settings to the opposite A/B state; i.e. if you’re on the A state, clicking the arrow will copy those settings to the B state.
Selects the B settings state.

Toolbar

Introduced in version 3.10, the toolbar at the bottom of the plugin holds a handful of shortcut buttons.

Icon Action
Opens preferences menu
Shows diagnostic information
Opens plugin manual in your default web browser
Opens a URL representation of the current plugin control state (Command/Ctrl + Click to copy the URL to the clipboard)
Opens language-selection menu
Opens MIDI Learn menu
Shrink interface
Enlarge interface

Keyboard Shortcuts

Action Keyboard Shortcut
Enter New Parameter Value Once you’ve tapped or double-tapped a control, type in a value, then hit Enter, Return, or Tab
Increment Parameter Value or arrow keys
Decrement Parameter Value or arrow keys
Jump to Next Parameter Tab
Jump to Previous Parameter Shift + Tab or ` (backtick)
Escape Parameter Focus / Close any Open Drawers Esc
Tap Tempo t or Click (N.B. For this to work, you must have a BPM or milliseconds control selected.)
Save Preset n (N.B. For this to work, the preset panel must be open.)
Set Preset as Favorite f (N.B. For this to work, the preset panel must be open.)
Edit Preset e (N.B. For this to work, the preset panel must be open.)
Update Preset u (N.B. For this to work, the preset panel must be open.)
Delete Preset Delete (N.B. For this to work, the preset panel must be open.)

Right-Click Actions

Action Instruction
Read about Control in manual Right-Click & select “Show in Plugin Manual”
Reset Control to Default Right-Click & select “Reset to Factory Default Value”
Lock Control when switching presets Right-Click & select “Lock When Switching Presets”
Copy current plugin settings to clipboard Right-Click & select “Copy as URL to Clipboard”
Paste all plugin settings from clipboard Right-Click & select “Paste From Clipboard”
Reset all plugin settings to Defaults Right-Click & select “Reset All to Defaults”
Reset all plugin metering Right-Click & select “Reset Meters” (only available in certain plugins)
Reset all plugin settings to Preset Right-Click & select “Reset to [preset] Preset”
Update Preset with current plugin settings Right-Click & select “Update [preset] Preset”
Create new Preset with current plugin settings Right-Click & select “Create New Preset”
Go to the plugin’s manual page Right-Click & select “Read [plugin name] Manual”

Right-Click Preferences

Action Explanation
Language Switch the display language of text elements in Goodhertz plugins. We currently support the following languages: English, Spanish, Portuguese, French, Italian, Japanese, Korean, Chinese (Simplified), Chinese (Traditional), and Arabic.
Always Open Advanced Pane By default, this is Off — i.e. when the plugins open, they do not show you the advanced controls available by hitting the ••• button in the sidebar. If you’d like to always see the advanced controls, enable this preference.
Control Granularity By default, all Goodhertz controls move in small increments when dragged. If you prefer controls to operate with larger increments by default, change this option to Coarse. N.B. This will swap the behavior of the Shift mouse modifier - i.e. Shift-dragging will move a control with standard granularity when set to Coarse.
Dark Mode Allows you to choose the color palette used for displaying the interface. If you prefer the look of dark colors (or work in a darker environment) enable this option. The Auto option will automatically adjust the color scheme depending on the system preferences of your machine (Mac only).
Enable Hover Markers By default, this is On — i.e. all controls will show markers on hover. If you find this behavior unnecessary, deselect this option and no markers will be shown.
Enable Metering By default, this is On — i.e. in normal operation, all audio meters and visualizations available in Goodhertz plugins are enabled and running. If you’d like to turn them off and disable all metering and visualization, deselect this option. And to turn them back on, simply reselect it. N.B. If you’re struggling to use a large number of Goodhertz plugins on an older processor with an integrated GPU, sometimes disabling metering can help.
Enable Scroll Input By default, all Goodhertz sliders can be scrolled in addition to dragged. If you find this behavior unnecessary, deselect this option and no scrolling events will be used to control Goodhertz sliders.
Enable Tooltips By default, this is On — i.e. all controls will show a tooltip on hover. If you find this behavior unnecessary, deselect this option and no tooltips will be shown.
GPU Acceleration By default, this is Enabled — i.e. the GPU will be prioritized whenever possible to improve graphics performance. If your graphics card does not support GPU acceleration, this preference will be automatically set to Reduced. N.B. If you experience graphics issues, disabling this preference may help.
Keyboard Focus By default, you can get keyboard focus on any Goodhertz control with a single click. Change this option to ensure keyboard focus only occurs on double clicks.
Window Size Enlarge or shrink the Goodhertz plugin window by selecting an option here. This will save your preference for all instances of this plugin.
Diagnostics Displays general information about the plugin and the configuration of your system for diagnostic purposes. If you experience any issues with the plugin, it can be helpful to include this information when contacting us. N.B. Clicking this window will copy the contents to the clipboard.
MIDI Learn Configure the mapping used to control parameters via MIDI messages. To assign a MIDI number to a control, enable MIDI Learn and send a MIDI message while a control is focused. To remove an assigned mapping, click on a mapping entry in the list or select Clear All to reset the entire mapping. N.B. You can assign different types of MIDI messages including Pitch Bend, Note, and CC messages.

Mouse Modifiers

Action Combination (Mac) Combination (Windows)
Reset Parameter to Default Value Option + Click Alt + Click
Move Control with Coarse Precision Shift + Drag Shift + Drag
Move Control with Fine Precision Command + Drag Ctrl + Drag
Move Control with Normal Precision Drag Drag

Automation

Unintentional digital clicks and pops are the worst. They happen for lots of reasons and often end up wasting your time with needless revisions or mastering surgery. When they go unnoticed, they can make their way onto commercial albums and releases.

Plugin automation is a common cause of clicks and pops. Sweeping an EQ band, changing a delay setting, and even automating a plugin bypass can cause digital artifacts if poorly handled.

This is not true for Goodhertz plugins. Any parameter in a Goodhertz plugin, even on/off switches, can be automated freely and smoothly without clicks, pops, or zipper noises (unless otherwise noted). You can push them, pull them, LFO them — whatever you do, they’ll handle it gracefully.

Since our Master On/Off controls won’t create artifacts, we recommend that you use them rather than your DAW-supplied plugin bypass if you want to disable plugin processing.

Plugin Settings

Goodhertz plugin settings can be copied and pasted as text urls, which look like this: https://goodhertz.com/vulf-comp/3.0.9?cm=0&wf=0&lf=100&lfc=50

To copy and paste, right click anywhere on the plugin interface and select either the copy or the paste option.

E.g. If you paste “https://goodhertz.com/vulf-comp/3.0.9?cm=0&wf=0&lf=100&lfc=50” into Vulf Compressor it will recall the settings associated with that url. This way you can easily send an exact plugin setting to someone — in an email or even a tweet — without any guesswork or screenshots.”

System Requirements

Mac OS X ≥ 10.13

Audio Unit 64-Bit, VST 64-Bit, VST3 64-Bit, or AAX 64-Bit host

Windows ≥ 10

VST 64-Bit, VST3 64-Bit, or AAX 64-Bit host

Contact Support

To send plugin feedback, please e-mail us at feedback@goodhertz.com.

If you have a quick question, send us a tweet @Goodhertz. We’re often able to respond faster to tweets than emails.

If you’re having trouble, experiencing a technical issue, or you think you’ve found a bug, please email support@goodhertz.com.

Find all our contact info & bug-reporting protocol on the contact page.