Primary Controls
Reverb
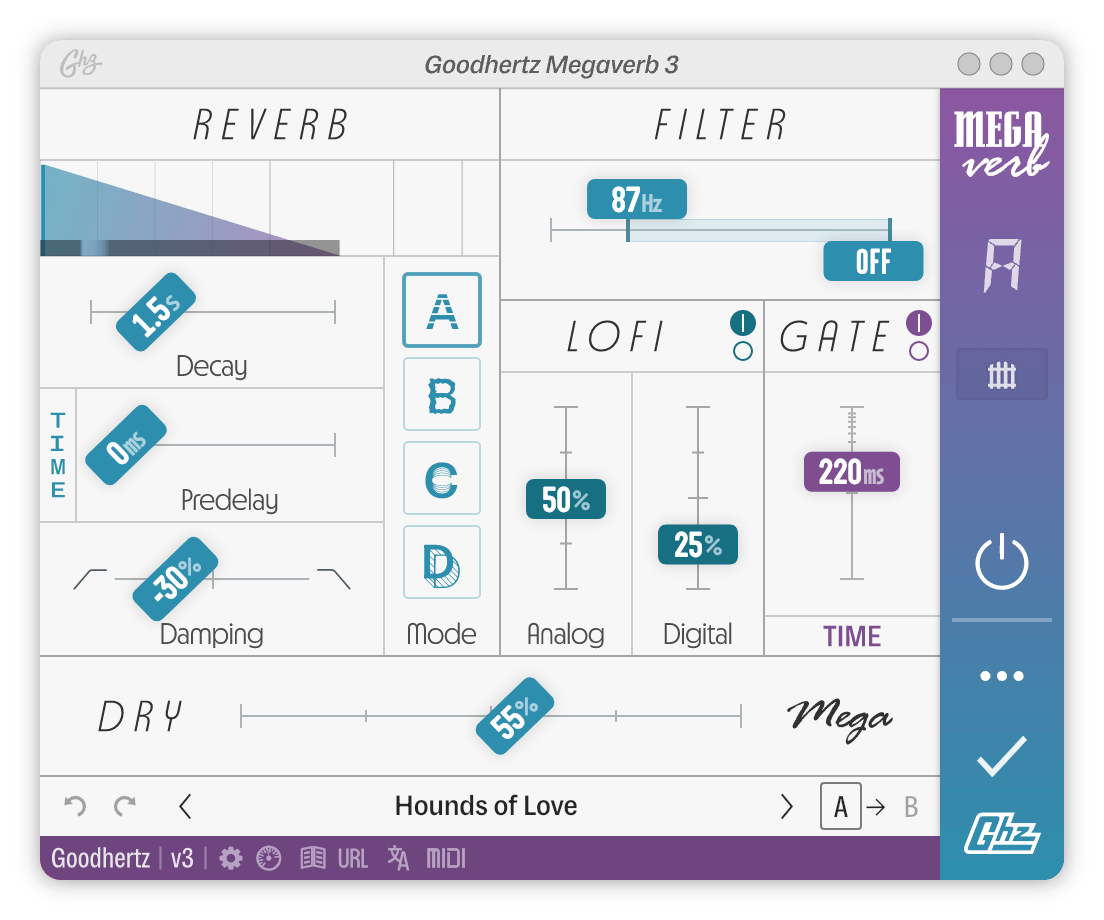
Megaverb has an interactive sketch showing the overall shape of the reverb’s impulse response, its early reflections, and how it interacts with the Gate.
 Reverb Sketch
Verb Decay
Controls how long it takes for the reverb to decay.
Verb Decay sets the approximate RT60 time for Megaverb’s decay (the RT60 is defined as the time it takes for the reverb to decay 60 dB from its peak level).
Here are some common RT60 times for reference:
| Space | RT60 |
|---|---|
| Room | 0.5 - 2 sec |
| Concert Hall | 1.5 - 4 sec |
| Church / Cathedral | 2 - 15 sec |
Verb Predelay
Controls the amount of time before the reverb onset begins.
At 0 ms, the reverb begins immediately, with no gap in time between the dry signal and the start of the wet (reverb) signal.
At longer Verb Predelay settings, like 50 ms, there will be a short gap in time between the dry signal and the start of the wet (reverb) signal.
At even longer Verb Predelay settings above around 100 ms, there will be a very obvious audible gap — like a slapback delay — between the dry signal and the start of the wet (reverb) signal.
Verb Predelay can be set via tap tempo. Use the T key when the control is highlighted to tap in your desired tempo.
If you change the predelay quickly, you may hear some pitch modulation. Don’t be alarmed; this effect is similar to the Doppler effect you hear as a fast-moving object passes you (like a car honking its horn).
Why would I want this control?
Great question! Verb Predelay gives you more precise control over how the reverb and direct sound interact: when there’s no predelay, the reverb is fused with the direct sound, creating a single, cohesive image. When there’s more predelay, the direct sound stands apart from the reverb, increasing the direct sound’s clarity and focus.
For example, if you’re mixing a lead vocal with Megaverb and you want more focus on the lead, try using a Verb Predelay setting of 15 to 30 ms.
Verb Predelay Note
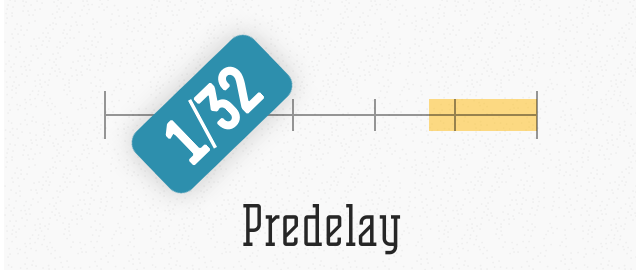
Like Verb Predelay, but in musical note lengths (quarter note, eighth note, etc) synced to the DAW’s project tempo.
This control does not appear in the default configuration of Megaverb, and must be enabled by the Verb Predelay Sync control, immediately to the left of Verb Predelay.
Megaverb has an internal predelay limit of a half note at 60BPM. If your tempo is below 60BPM, a bar will appear on the control to cover invalid note lengths.
 Predelay Limit
Verb Predelay Sync
When set to values other than TIME, this control enables the Verb Predelay Note control, meaning Predelay will be synced to fractional units of the current project tempo.
| Mode | Description |
|---|---|
| TIME | Seconds |
| NOTE | Tempo-synced |
| DOT | Tempo-synced, dotted note values |
| TRIP | Tempo-synced, triplet note values |
Verb Damping
Controls the timbre of the reverb as it decays.
At 100%, the reverb decay gets darker over time for a more muffled sound with less high frequency content (e.g. a heavily carpeted room).
At -100%, the reverb decay gets brighter over time for a thinner sound with more high frequency content.
When focused on Verb Damping, the sidebar illustration will show the frequency response of the decay filter.
Verb Mode
Selects the reverb algorithm. Each algorithm has its own distinct character and style.
| Option | Symbol | About | Discussion |
|---|---|---|---|
| A | Quick, resonant |
Phil Collins — Sussudio |
|
| B | Weird, nonlinear |
David Bowie — Let’s Dance |
|
| C | Smooth, cavernous |
Whitney Houston — I Wanna Dance With Somebody |
|
| D | A larger cavern |
Aphex Twin — Polynomial C |
In general, the Verb Mode’s go in order from smallest to largest, where A has the least amount of buildup in the early reflections, and D has the longest buildup in the early reflections. That said, that doesn’t mean you can’t use A with a long Verb Decay or D with a short Verb Decay. Follow your ears!
Filter
The Filter section allows you to shape the frequency content of the reverb signal directly with high/low cut filters.
Filter Range Low
Controls the cutoff frequency of the reverb’s low cut filter.
When Filter Range Low is set to Off, no low cut filter is applied.
Check the sidebar to see the frequency response of the filter when you focus on Filter Range Low or Filter Range High.
Filter Range High
Controls the cutoff frequency of the reverb’s high cut filter.
When Filter Range High is set to Off, no high cut filter is applied.
Check the sidebar to see the frequency response of the filter when you focus on Filter Range Low or Filter Range High.
Lofi
A big part of the sound of early digital reverbs came from their lack of digital resolution and their lofi digital converters. We’ve modeled these characteristics in Megaverb and have split them into digital & analog controls that can be dialed in separately: Lofi Amount Analog & Lofi Amount Digital.
Lofi Amount Analog
Controls the amount of analog clipping applied to the reverb signal.
Increasing Lofi Amount Analog will cause more audible analog-style clipping, similar in sound to a hard-clipped transistor.
Lofi Amount Digital
Controls the amount of digital degradation applied to the reverb signal.
Increasing Lofi Amount Digital will decrease the bit depth and headroom available to the reverb, creating a grittier, gnarlier sound. In the extreme settings, the reverb will become very noisy and very distorted.
A setting of 20% corresponds to approximately 12 bits of internal resolution for the reverb.
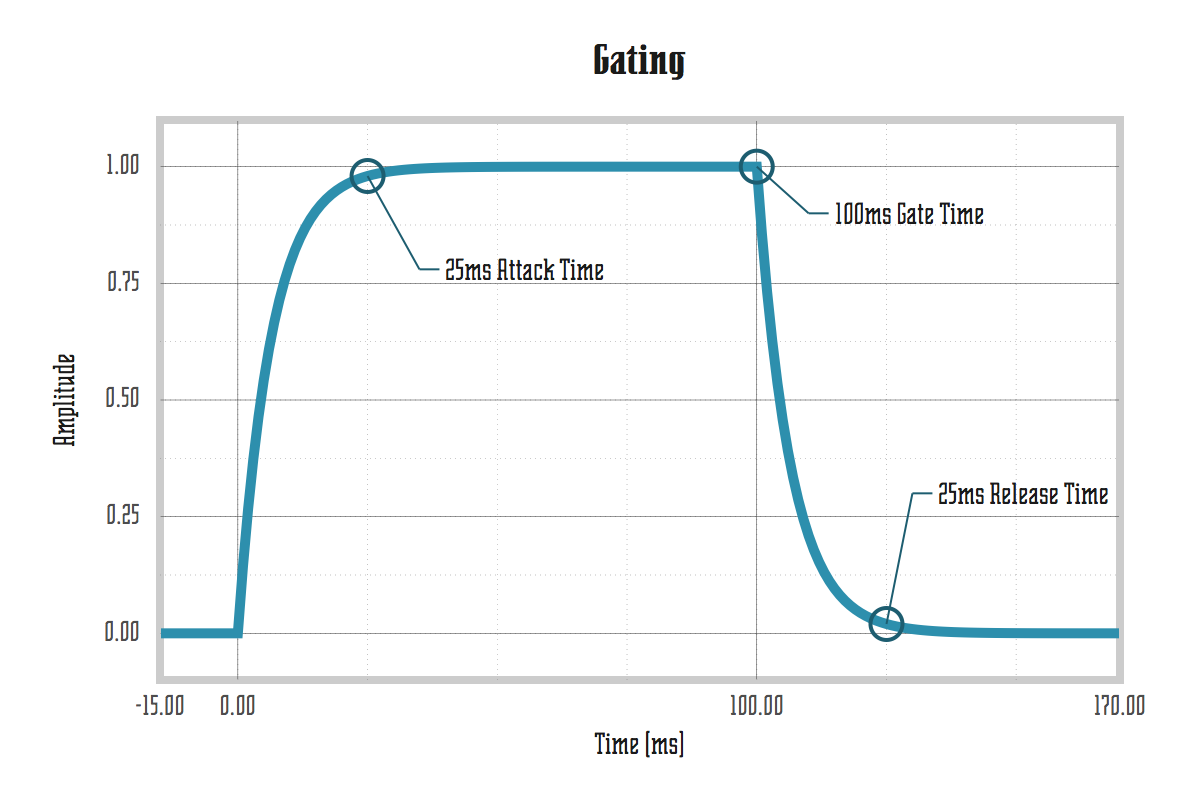
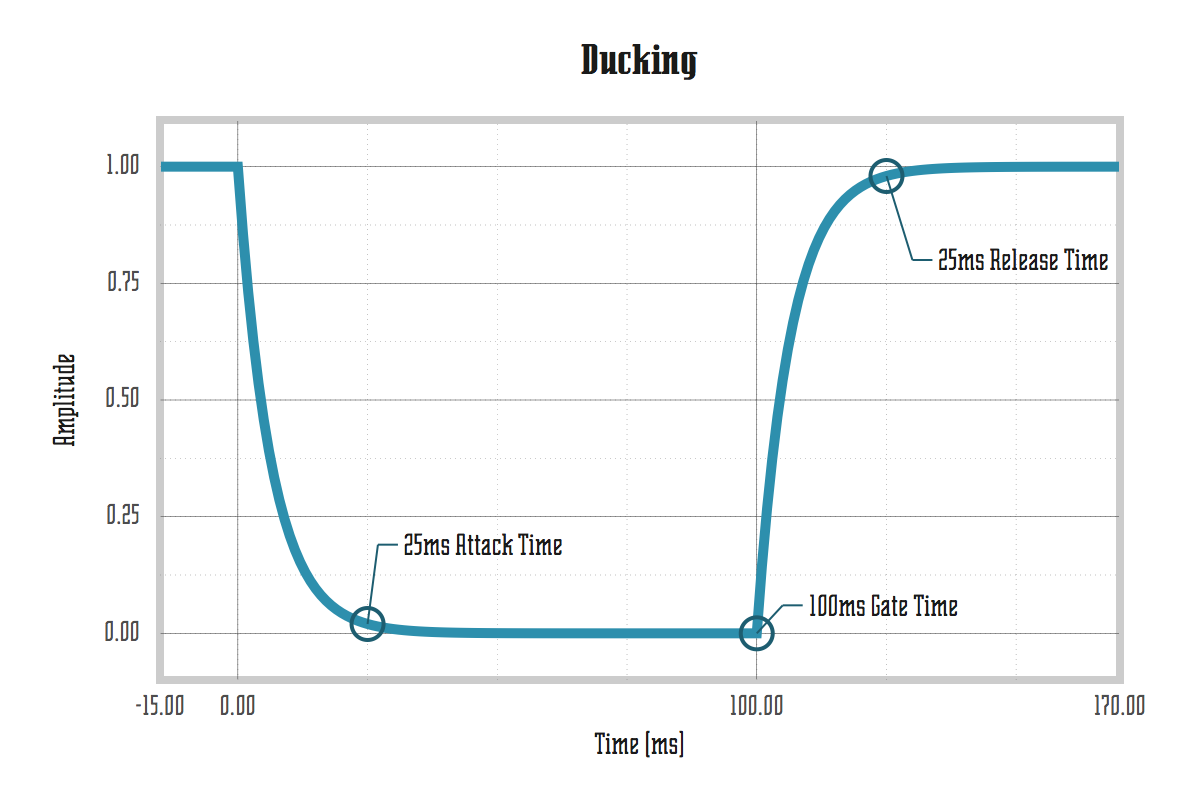
Gate
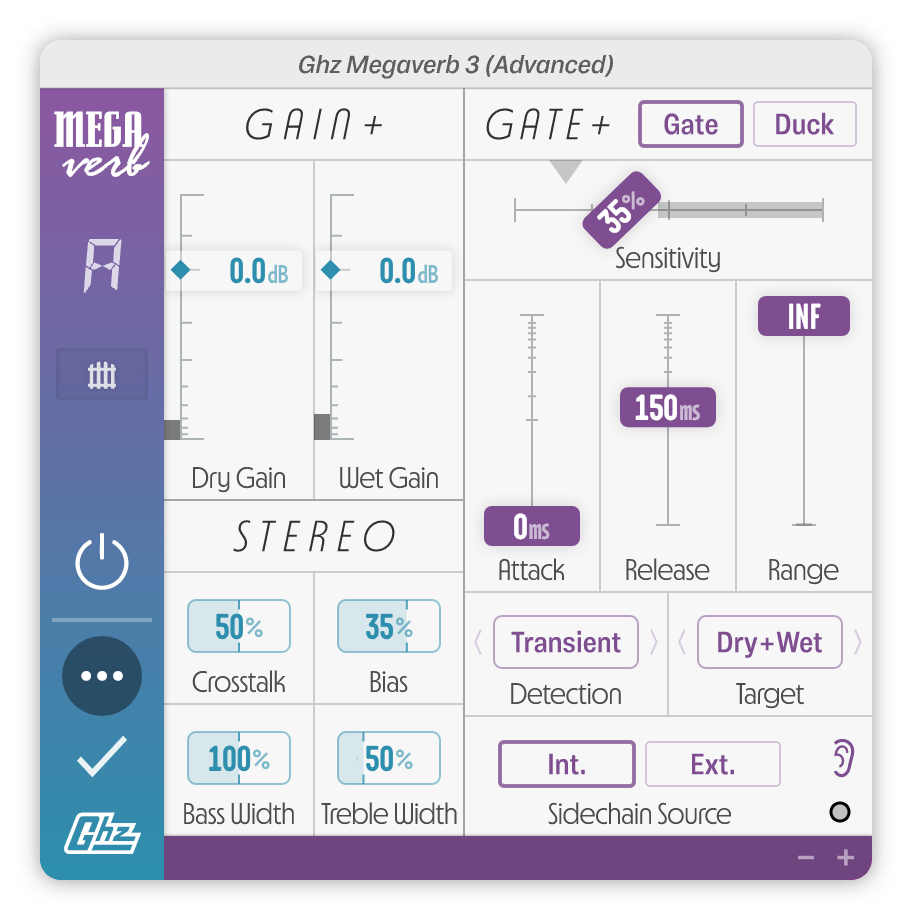
Gated reverb is a quintessentially 80’s sound, and Megaverb makes achieving that sound easy: just turn on the gate and trigger it with something transient (you can also trigger Megaverb’s gate with the built-in sidechain if desired). But Megaverb doesn’t stop there! — we’ve also added a ton of other gating and ducking options that make it possible to achieve highly dynamic, adaptive reverb sounds and other interesting gating effects. See the Advanced Gate + controls for more information on how the advanced controls work and what you can do with them.
Gate Time
Controls how long the gate will stay open each time it is triggered.
For more control of the gate timing, see Gate Attack Time & Gate Release Time in the Advanced section.
Gate Time can be set via tap tempo. Use the T key when the control is highlighted to tap in your desired tempo.
Gate Time Note
Like Gate Time, but in musical note lengths synced to the DAW’s project tempo.
This control does not appear in the default configuration of Megaverb, and must be enabled by the Gate Time Sync control, immediately below Gate Time.
Gate Time Sync
When set to values other than TIME, this control enables the Gate Time Note control, meaning gate time will be synced to fractional units of the current project tempo.
| Mode | Description |
|---|---|
| TIME | Seconds |
| NOTE | Tempo-synced |
| DOT | Tempo-synced, dotted note values |
| TRIP | Tempo-synced, triplets note values |
Master Mix
Controls Megaverb’s overall wet/dry mix.
At 0% the output will be dry (direct) signal only, while at 100% the output will be wet (reverb) signal only. At 50% the output will be an equal mix of wet and dry.
The Master Mix does not affect the operation of Megaverb’s gate, and even at a MasterMix of 0%, the gating can still affect the dry signal (if you have chosen a Dry Gate Target).
If you’d like to “lock” the Master Mix while changing presets, just right-click anywhere on the control and choose the “Lock Master Mix When Switching Presets” option.
How should I set the Master Mix when using Megaverb with an auxiliary send?
Usually 100%.
Why should I use Megaverb with an auxiliary send?
Depending on what you’re trying to achieve, it often makes sense to put reverbs on a dedicated aux track, allowing you to send multiple sources to a single reverb instance. Some potential advantages are:
- Lower CPU usage. Instead of having an instance of Megaverb for each background vocal, you can achieve the same effect with only one!
- Mix cohesion. Using reverb aux sends helps promote mix cohesion, allowing you to use the same reverb on multiple sources for a more unified sound.
- Retain source panning. Unlike an insert, which is generally pre-panning, aux sends can be post-panning, preserving the stereo placement of the source in the reverb.
- More control. Putting reverbs on a dedicated aux allows you to add other plugins or processing to the reverb signal.