DC19

It’s a delay you can play

A delay in motion — that’s a beautiful thing. DC19 is a playable delay, an experimental plugin built with hardware controllers & automation in mind. Where a standard delay gives you a button, DC19 gives you a slider.

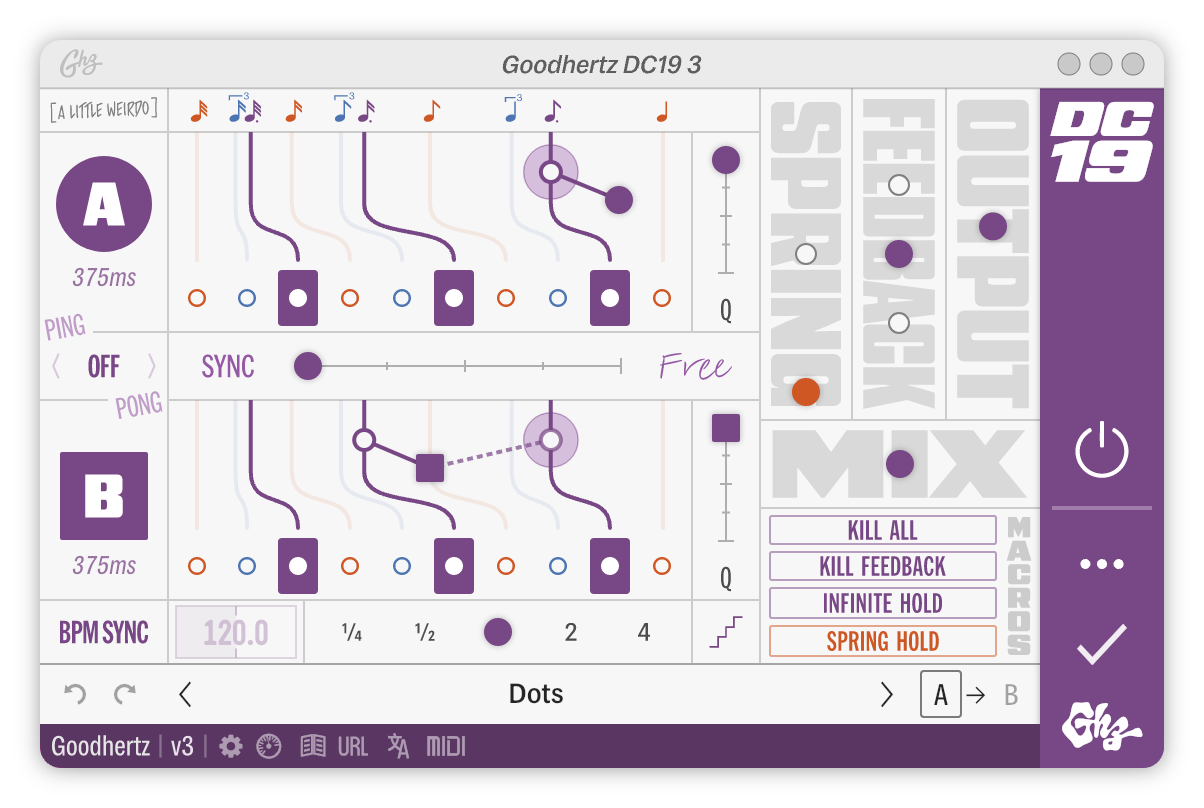
Interface Preview

Here’s a screenshot of DC19 in action. Click anywhere on the interface to jump to a control’s definition below.

Advanced Controls

Controls

Primary Controls

A Controls

A: On/Off

Turns On or Off the input to Delay A.

Options: Off, On

This control will not stop Delay A’s feedback and thus can be used creatively for delay throws or other cool delay effects.

  • Default On

A: Time

Controls the delay time for Delay A.

This control’s values are in “milli-” and depend on the Tempo Mode selection. For example, a value of 500.0, is half of whatever the quarter note value is.

  • Min 125.0
  • Max 1000.0
  • Default 900.0

A: Quantization

Controls how much quantization is applied to A: Time.

At 0% the delay time is unquantized.

At 100% the delay time is fully quantized.

  • Min 0%
  • Max 100%
  • Default 100%

Ping Pong

Switches between the different delay ping pong modes.

Options: Off, A, A+B

In Off ping pong mode, Delay A & Delay B’s audio paths operate independently and do not mix together or crossover.

In A ping pong mode, the output of Delay A is routed to the input of Delay B. This creates a classic ping pong delay, where the delay feedback alternates from side to side (depending on how A: Panner & B: Panner are set).

Although Delay B’s regular input is disconnected, B: Time still operates normally and will affect the ping pong delay time.

In A+B ping pong mode, the output of Delay A is routed to the input of Delay B, and conversely, the output of Delay B is routed to the input of Delay A. This creates, in effect, a double ping pong.

By setting the delay times differently for A & B, this mode can be used to create lush stereo delay patterns.

  • Default Off

A/B Time Sync

Controls how B: Time and A: Time are linked together.

At 0% the delay times are synced together, and A: Time fully controls B: Time.

At 100% each delay time operates freely.

  • Min 0%
  • Max 100%
  • Default 0%

B Controls

B: On/Off

Turns On or Off DC19’s B section.

Options: Off, On

This control will not stop Delay B’s feedback and thus can be used creatively for delay throws or other cool delay effects.

  • Default On

B: Time

Controls the delay time for Delay B.

This control’s values are in “milli” and depend on the Tempo Mode selection. For example, a value of 500.0, is half of whatever the quarter note value is.

  • Min 125.0
  • Max 1000.0
  • Default 500.0

B: Quantization

Controls how much quantization is applied to B: Time.

At 0% the delay time is unquantized.

At 100% the delay time is fully quantized.

  • Min 0%
  • Max 100%
  • Default 100%

BPM Controls

Tempo Mode

Controls the global timing source for DC19.

Mode Description
BPM Sync Uses the host/DAW tempo
BPM Free Uses the tempo set manually in Tempo BPM
MS Uses the millsecond value set in Tempo MS

Options: BPM Sync, BPM Free, MS

  • Default BPM Sync

Tempo BPM

Sets DC19’s tempo in beats per minute (BPM).

The tempo can be set via tap tempo. Use the T key when the control is highlighted or mouse clicks to tap in your desired tempo.

This control will be overridden when Tempo Mode is set to BPM Sync.

  • Min 30.0
  • Max 300.0
  • Default 120.0

Tempo MS

DC19’s tempo in milliseconds (MS).

The tempo can be set via tap tempo. Use the T key when the control is highlighted or mouse clicks to tap in your desired tempo.

  • Min 100ms
  • Max 2.000s
  • Default 500ms

Tempo Multiplier Discrete

Increases or decreases the tempo by a discrete multiple.

Example: 60bpm2x = 120bpm

Example: 500ms2x = 250ms

The Tempo Multiplier Discrete is active for both BPM & MS Tempo Mode’s.

  • Min 1/4
  • Max 4
  • Default 1

Tempo Multiplier Continuous

Increases or decreases the tempo by a multiple without rounding.

Example: 60bpm2x = 120bpm

Example: 500ms2x = 250ms

The Tempo Multiplier Continuous is active for both BPM & MS Tempo Mode’s.

  • Min 0.25x
  • Max 4.00x
  • Default 1.00x

Tempo Multiplier Mode

Switches between discrete or continuous tempo multipliers.

Option Symbol
Discrete

Continuous

  • Default Discrete

Spring Amount

Controls the overall amount of spring reverb.

  • Min 0%
  • Max 100%
  • Default 0%

Feedback

Controls how much of the delay signal is fed back into the delays‘ inputs.

At 0%, there is no feedback, and only a single delay echo will be heard. At higher values less than 100%, more delay echos will be heard, decaying out exponentially. An effort is made internally to match the RT60 of the A and B decay times in the event that A: Time and B: Time are different. Above 100%, the delay echos will continue infinitely, passing through the analog tape & filter sections over and over again.

Internally, DC19 has a soft limiter on the feedback loop, which will prevent the feedback from increasing without bound. That said, things can still get quite loud when Feedback is pushed hard and should be handled with care.

  • Min 0%
  • Max 200%
  • Default 50%

Output Gain

Controls the output gain after DC19’s processing.

  • Min -36.0dB
  • Max 24.0dB
  • Default 0.0dB

Mix

Controls DC19’s overall wet/dry mix.

At 0% the output will be dry (direct) signal only, while at 100% the output will be all wet (delay) signal only. At 50% the output will be an equal mix of wet and dry.

  • Min 0%
  • Max 100%
  • Default 50%

Macros

Kill All

Mutes the delay signal and clears all delay buffers.

Options: Off, On

Shift + Click to latch the control.
  • Default Off

Kill Feedback

Clears the delay feedback while retaining the delay buffer.

Options: Off, On

Shift + Click to latch the control.
  • Default Off

Infinite Hold

Infinitely holds the feedback.

Options: Off, On

Shift + Click to latch the control.

  • Default Off

Spring Hold

Pins the Spring Amount at 100% and internally routes all audio through the spring.

Options: Off, On

Shift + Click to latch the control.

  • Default Off

Master On/Off

Bypasses DC19’s processing.

We recommend using the Master On/Off instead of your DAW’s plugin bypass to avoid digital artifacts.

  • Default On

Advanced Controls

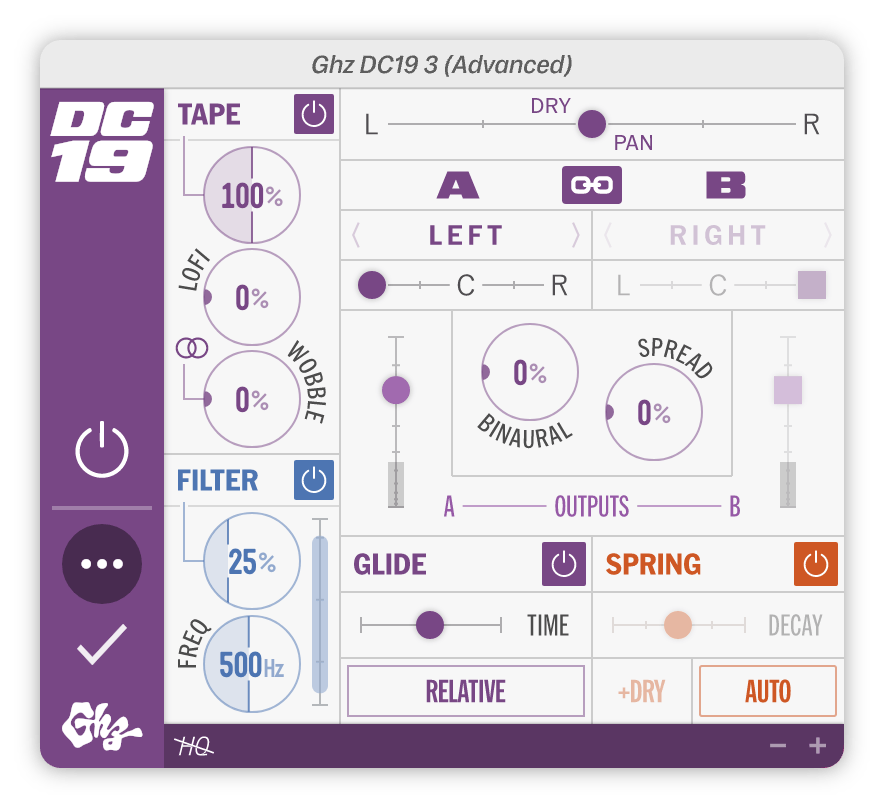
The Advanced section offers more precise control and fine adjustment options.

To access DC19’s advanced controls, click the ••• icon in the sidebar.

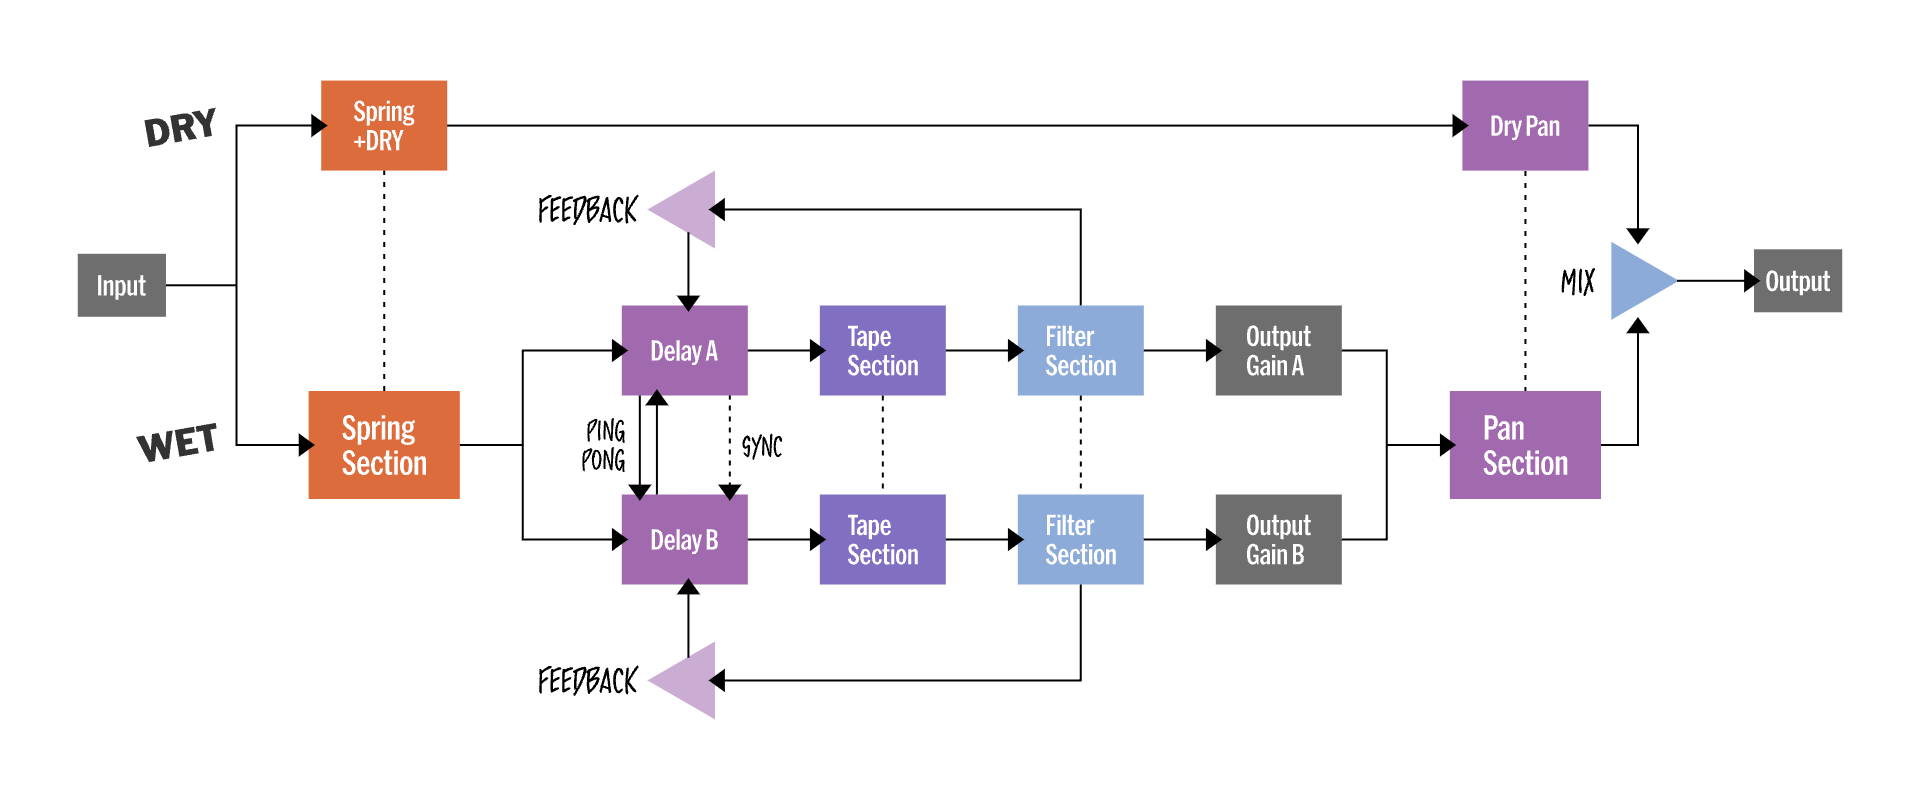
Signal Flow

It can be a bit tricky to understand the signal flow in DC19 because the delay feedback is involved and because DC19 just does so many things! The delay, spring reverb, and panning all interact differently depending on how the plugin is configured.

Here’s a simplified block diagram that shows the high level routing options in DC19:

DC19 Signal Flow

Tape Controls

Tape On/Off

Turns the analog tape section On or Off.

The analog tape section is inside DC19’s feedback loop and greatly impacts how delay echos will decay over time.

  • Default On

Tape Amount

Controls the amount of tape coloration & saturation.

  • Min 0%
  • Max 200%
  • Default 100%

Tape Lofi

Controls which tape machine is used in DC19’s feedback loop, becoming progressively more lofi as the control is increased.

The tape machines listed below are used at different points in the control range; in-between values are a blend of multiple tape machine algorithms.

Tape Lofi Specifications

Setting Tape Machine
0% Hifi 30 IPS reel-to-reel machine
66% 7.5 IPS reel-to-reel machine with warm, round character
133% Professional 4-track tape deck
200% Consumer cassette deck with aged & degraded tape
  • Min 0%
  • Max 200%
  • Default 0%

Tape Wobble

Controls the amount of tape modulation.

Unlike a well-behaved wow & flutter algorithm, PluginName’s Tape Wobble is more woozy & sporadic. Even at lower values, it can help inject movement into otherwise static sounds.

  • Min 0%
  • Max 200%
  • Default 0%

Tape Wobble Stereo

Switches between stereo (independent) or mono (synchronized) tape wobble.

Option Symbol
Off

On

  • Default On

Filter Controls

Filter On/Off

Turns the filter section On or Off.

  • Default On

Filter Amount

Controls the overall amount of filtering.

At lower values near 0%, the filter is wide and broad. At higher values near 100%, the filter becomes very narrow and resonant.

DC19 uniquely manages the gain in the feedback loop based on the shape and depth of filtering and attempts to keep the feedback decay consistent, regardless of the Filter Amount setting.

  • Min 0%
  • Max 100%
  • Default 25%

Filter Freq

Controls the center frequency of the filter.

At its minimum setting, the filter becomes a high cut filter, only filtering out the higher frequencies in the signal. Conversely, at its maximum setting, the filter becomes a low cut filter, only filtering out the lower frequencies in the signal.

  • Min 20Hz
  • Max 20.0kHz
  • Default 500Hz

Pan Controls

Dry Pan

Controls the panning of the dry signal.

  • Min -100%
  • Max 100%
  • Default 0%

Pan Link A/B

Links input modes and output gains together and inversely links A: Panner and B: Panner (i.e. B: Panner will be set to the opposite of A: Panner).

  • Default On

A: Input Mode

Selects the input signal for Delay A.

Options: Left, Right, Sum

  • Default Left

B: Input Mode

Selects the input signal for Delay B.

Options: Right, Left, Sum

  • Default Right

A: Panner

Controls Delay A’s panning.

  • Min -100%
  • Max 100%
  • Default -100%

B: Panner

Controls Delay B’s panning.

  • Min -100%
  • Max 100%
  • Default 100%

A: Output Gain

Controls the output gain of Delay A.

This control is post feedback.

  • Min -96.0dB
  • Max 12.0dB
  • Default 0.0dB

B: Output Gain

Controls the output gain of Delay B.

This control is post feedback.

  • Min -96.0dB
  • Max 12.0dB
  • Default 0.0dB

Pan Binaural Amount

Controls the type of panning algorithm used to pan the delay signals.

At 0%, the panning algorithm is a standard level-based panner. At 100%, the panning is a binaural panning algorithm that uses a combination of interaural time delays and frequency-dependent interaural level differences to pan the delay signals in space.

  • Min 0%
  • Max 100%
  • Default 0%

Pan Spread

Controls the stereo spread of the panning algorithm. At 0%, sounds will be panned directionally, occupying a distinct position in the soundstage. At 100%, sounds will spread out and diffuse across the stereo field.

  • Min 0%
  • Max 100%
  • Default 0%

Glide Controls

Glide On/Off

Controls how the pitch behaves as the delay time is changed.

When turned On, the delay time seamlessly glides between values as though a delay head is gliding to new positions on analog tape.

When turned Off, the delay time seamlessly jumps to new positions.

HQ Mode has a big impact of the character of the delay gliding. We recommend turning HQ Mode if want the smoothest sounding glides.

  • Default On

Glide Time

Controls approximately how long it will take the delay time to travel from one extreme to the other.

Glide Time can be set via tap tempo. Use the T key when the control is highlighted to tap in your desired tempo.

At extremely fast delay glide times, fast chirps and pitch glissandos may be heard.

  • Min 10ms
  • Max 10.000s
  • Default 1.000s

Glide Mode

Controls how the glide time is calculated.

Options: Relative, Absolute

In Relative mode, Glide Time sets maximum travel time for the currently-displayed delay range; delay changes within that range will glide for a fraction of the maximum time. In Absolute mode, the glide time is fixed no matter how large or small the delay change.

  • Default Relative

Spring Controls

Spring On/Off

Turns the spring reverb on or off.

  • Default On

Spring Add Dry

Applies the spring reverb to the dry signal in addition to the delay signals.

Options: Off, On

  • Default Off

Spring Decay

Controls the decay time of the spring reverb.

  • Min 0%
  • Max 100%
  • Default 50%

Spring Decay Mode

Controls whether the spring decay operates manually or based on the setting of Spring Amount.

Options: Auto, Manual

  • Default Auto

HQ Mode

HQ Mode is our no-holds-barred processing mode where super high quality audio is given priority over CPU usage.

When HQ Mode is turned On, DC19 uses a higher precision algorithm, providing better spectral resolution at the expense of higher CPU usage.

Option Symbol
Off

On

We recommend using HQ Mode when you need the highest possible quality and don’t mind 2-4x higher CPU usage. An important lead instrument, vocal, or a mastering session is a great place for HQ Mode.

HQ Mode cannot be MIDI mapped since automating it is not recommended.

  • Default Off

A Quantizers

The row of buttons below A Time individual quantizers. They are listed here at the end of the parameter section for reference.

A: Quantize 32nd

Quantizes A to the 32nd note.

  • Default Off

A: Quantize Trip 16th

Quantizes A to the Trip 16th note.

  • Default Off

A: Quantize Dot 32nd

Quantizes A to the Dot 32nd note.

  • Default Off

A: Quantize 16th

Quantizes A to the 16th note.

  • Default Off

A: Quantize Trip 8th

Quantizes A to the Trip 8th note.

  • Default Off

A: Quantize Dot 16th

Quantizes A to the Dot 16th note.

  • Default Off

A: Quantize 8th

Quantizes A to the 8th note.

  • Default Off

A: Quantize Trip Quarter

Quantizes A to the Trip Quarter note.

  • Default Off

A: Quantize Dot 8th

Quantizes A to the Dot 8th note.

  • Default Off

A: Quantize Quarter

Quantizes A to the Quarter note.

  • Default Off

B Quantizers

The row of buttons below B Time individual quantizers. They are listed here at the end of the parameter section for reference.

B: Quantize 32nd

Quantizes B to the 32nd note.

  • Default Off

B: Quantize Trip 16th

Quantizes B to the Trip 16th note.

  • Default Off

B: Quantize Dot 32nd

Quantizes B to the Dot 32nd note.

  • Default Off

B: Quantize 16th

Quantizes B to the 16th note.

  • Default Off

B: Quantize Trip 8th

Quantizes B to the Trip 8th note.

  • Default Off

B: Quantize Dot 16th

Quantizes B to the Dot 16th note.

  • Default Off

B: Quantize 8th

Quantizes B to the 8th note.

  • Default Off

B: Quantize Trip Quarter

Quantizes B to the Trip Quarter note.

  • Default Off

B: Quantize Dot 8th

Quantizes B to the Dot 8th note.

  • Default Off

B: Quantize Quarter

Quantizes B to the Quarter note.

  • Default Off

Specs

Supported Channel Configurations

Input Channel # Output Channel #
1 2
2 2

Presets

The presets are a great way to get to know each plugin. The preset drawer can be accessed at the bottom of each plugin by clicking the current preset name.

Acknowledgements

Annlie Huang / Chris Conover / Collins (CLGN) / Diana Zheng / James Edmondson / Jeff Berner / Scott Tolinski / TaeHo Park / The Edge / Tim Golden

Authors

Devin Kerr / Rob Stenson / Jasper Duba / Noah Dayan

Translators

TaeHo Park / Tiago Frúgoli / Gustavo Guzmán / Reda Kermach / Noah Dayan / Gal Cohen / Sydney Bolton / Enrico Cirene

About Goodhertz Plugins

User Interface

Goodhertz plugins are made to be workhorse tools that sound amazing. We’ve put a lot of thought and care into the audio quality and plugin usability, and for that reason, we’ve opted for simple and direct controls & interfaces that don’t rely on photorealistic knobs or ornamental screw heads to communicate their meaning.

We’ve also decided to only include meters and graphs when we feel they will directly lead to a better sonic result. Meters/graphs can consume significant CPU resources, and we firmly believe that if it sounds good, it is good.

Our meters can be reset at any time using the “Reset Meters” button (in certain plugins) and manually enabled or disabled via the “Enable Metering” User Preference.

Preset Bar

Button Action
Undo the last parameter change.
Redo the last parameter change.
Switch to the previous preset.
“Preset Name” Opens the preset drawer (Option/Alt + Click to reset all plugin settings to preset).
Switch to the next preset.
Selects the A settings state.
This copies the current settings to the opposite A/B state; i.e. if you’re on the A state, clicking the arrow will copy those settings to the B state.
Selects the B settings state.

Toolbar

Introduced in version 3.10, the toolbar at the bottom of the plugin holds a handful of shortcut buttons.

Icon Action
Opens preferences menu
Shows diagnostic information
Opens plugin manual in your default web browser
Opens a URL representation of the current plugin control state (Command/Ctrl + Click to copy the URL to the clipboard)
Opens language-selection menu
Opens MIDI Learn menu
Shrink interface
Enlarge interface

Keyboard Shortcuts

Action Keyboard Shortcut
Enter New Parameter Value Once you’ve tapped or double-tapped a control, type in a value, then hit Enter, Return, or Tab
Increment Parameter Value or arrow keys
Decrement Parameter Value or arrow keys
Jump to Next Parameter Tab
Jump to Previous Parameter Shift + Tab or ` (backtick)
Escape Parameter Focus / Close any Open Drawers Esc
Tap Tempo t or Click (N.B. For this to work, you must have a BPM or milliseconds control selected.)
Save Preset n (N.B. For this to work, the preset panel must be open.)
Set Preset as Favorite f (N.B. For this to work, the preset panel must be open.)
Edit Preset e (N.B. For this to work, the preset panel must be open.)
Update Preset u (N.B. For this to work, the preset panel must be open.)
Delete Preset Delete (N.B. For this to work, the preset panel must be open.)

Right-Click Actions

Action Instruction
Read about Control in manual Right-Click & select “Show in Plugin Manual”
Reset Control to Default Right-Click & select “Reset to Factory Default Value”
Lock Control when switching presets Right-Click & select “Lock When Switching Presets”
Copy current plugin settings to clipboard Right-Click & select “Copy as URL to Clipboard”
Paste all plugin settings from clipboard Right-Click & select “Paste From Clipboard”
Reset all plugin settings to Defaults Right-Click & select “Reset All to Defaults”
Reset all plugin metering Right-Click & select “Reset Meters” (only available in certain plugins)
Reset all plugin settings to Preset Right-Click & select “Reset to [preset] Preset”
Update Preset with current plugin settings Right-Click & select “Update [preset] Preset”
Create new Preset with current plugin settings Right-Click & select “Create New Preset”
Go to the plugin’s manual page Right-Click & select “Read [plugin name] Manual”

Right-Click Preferences

Action Explanation
Language Switch the display language of text elements in Goodhertz plugins. We currently support the following languages: English, Spanish, Portuguese, French, Italian, Japanese, Korean, Chinese (Simplified), Chinese (Traditional), and Arabic.
Always Open Advanced Pane By default, this is Off — i.e. when the plugins open, they do not show you the advanced controls available by hitting the ••• button in the sidebar. If you’d like to always see the advanced controls, enable this preference.
Control Granularity By default, all Goodhertz controls move in small increments when dragged. If you prefer controls to operate with larger increments by default, change this option to Coarse. N.B. This will swap the behavior of the Shift mouse modifier - i.e. Shift-dragging will move a control with standard granularity when set to Coarse.
Dark Mode Allows you to choose the color palette used for displaying the interface. If you prefer the look of dark colors (or work in a darker environment) enable this option. The Auto option will automatically adjust the color scheme depending on the system preferences of your machine (Mac only).
Enable Hover Markers By default, this is On — i.e. all controls will show markers on hover. If you find this behavior unnecessary, deselect this option and no markers will be shown.
Enable Metering By default, this is On — i.e. in normal operation, all audio meters and visualizations available in Goodhertz plugins are enabled and running. If you’d like to turn them off and disable all metering and visualization, deselect this option. And to turn them back on, simply reselect it. N.B. If you’re struggling to use a large number of Goodhertz plugins on an older processor with an integrated GPU, sometimes disabling metering can help.
Enable Scroll Input By default, all Goodhertz sliders can be scrolled in addition to dragged. If you find this behavior unnecessary, deselect this option and no scrolling events will be used to control Goodhertz sliders.
Enable Tooltips By default, this is On — i.e. all controls will show a tooltip on hover. If you find this behavior unnecessary, deselect this option and no tooltips will be shown.
GPU Acceleration By default, this is Enabled — i.e. the GPU will be prioritized whenever possible to improve graphics performance. If your graphics card does not support GPU acceleration, this preference will be automatically set to Reduced. N.B. If you experience graphics issues, disabling this preference may help.
Keyboard Focus By default, you can get keyboard focus on any Goodhertz control with a single click. Change this option to ensure keyboard focus only occurs on double clicks.
Window Size Enlarge or shrink the Goodhertz plugin window by selecting an option here. This will save your preference for all instances of this plugin.
Diagnostics Displays general information about the plugin and the configuration of your system for diagnostic purposes. If you experience any issues with the plugin, it can be helpful to include this information when contacting us. N.B. Clicking this window will copy the contents to the clipboard.
MIDI Learn Configure the mapping used to control parameters via MIDI messages. To assign a MIDI number to a control, enable MIDI Learn and send a MIDI message while a control is focused. To remove an assigned mapping, click on a mapping entry in the list or select Clear All to reset the entire mapping. N.B. You can assign different types of MIDI messages including Pitch Bend, Note, and CC messages.

Mouse Modifiers

Action Combination (Mac) Combination (Windows)
Reset Parameter to Default Value Option + Click Alt + Click
Move Control with Coarse Precision Shift + Drag Shift + Drag
Move Control with Fine Precision Command + Drag Ctrl + Drag
Move Control with Normal Precision Drag Drag

Automation

Unintentional digital clicks and pops are the worst. They happen for lots of reasons and often end up wasting your time with needless revisions or mastering surgery. When they go unnoticed, they can make their way onto commercial albums and releases.

Plugin automation is a common cause of clicks and pops. Sweeping an EQ band, changing a delay setting, and even automating a plugin bypass can cause digital artifacts if poorly handled.

This is not true for Goodhertz plugins. Any parameter in a Goodhertz plugin, even on/off switches, can be automated freely and smoothly without clicks, pops, or zipper noises (unless otherwise noted). You can push them, pull them, LFO them — whatever you do, they’ll handle it gracefully.

Since our Master On/Off controls won’t create artifacts, we recommend that you use them rather than your DAW-supplied plugin bypass if you want to disable plugin processing.

Plugin Settings

Goodhertz plugin settings can be copied and pasted as text urls, which look like this: https://goodhertz.com/vulf-comp/3.0.9?cm=0&wf=0&lf=100&lfc=50

To copy and paste, right click anywhere on the plugin interface and select either the copy or the paste option.

E.g. If you paste “https://goodhertz.com/vulf-comp/3.0.9?cm=0&wf=0&lf=100&lfc=50” into Vulf Compressor it will recall the settings associated with that url. This way you can easily send an exact plugin setting to someone — in an email or even a tweet — without any guesswork or screenshots.”

System Requirements

Mac OS X ≥ 10.13

Audio Unit 64-Bit, VST 64-Bit, VST3 64-Bit, or AAX 64-Bit host

Windows ≥ 10

VST 64-Bit, VST3 64-Bit, or AAX 64-Bit host

Contact Support

To send plugin feedback, please e-mail us at feedback@goodhertz.com.

If you have a quick question, send us a tweet @Goodhertz. We’re often able to respond faster to tweets than emails.

If you’re having trouble, experiencing a technical issue, or you think you’ve found a bug, please email support@goodhertz.com.

Find all our contact info & bug-reporting protocol on the contact page.