CanOpener Studio

Conjure speakers from your headphones

By making your headphones behave a bit more like loudspeakers, the CanOpener Studio crossfeed algorithm allows you to recreate, on headphones, the rich sonic experience of listening to high-end speakers in a finely tuned room. Combined with a gorgeous equalizer and serious monitoring controls, CanOpener Studio is great for tracking — allowing performers to get the perfect headphone mix, and it’s also equally useful on the master output — to help correct or enhance your monitoring environment.

Interface Preview

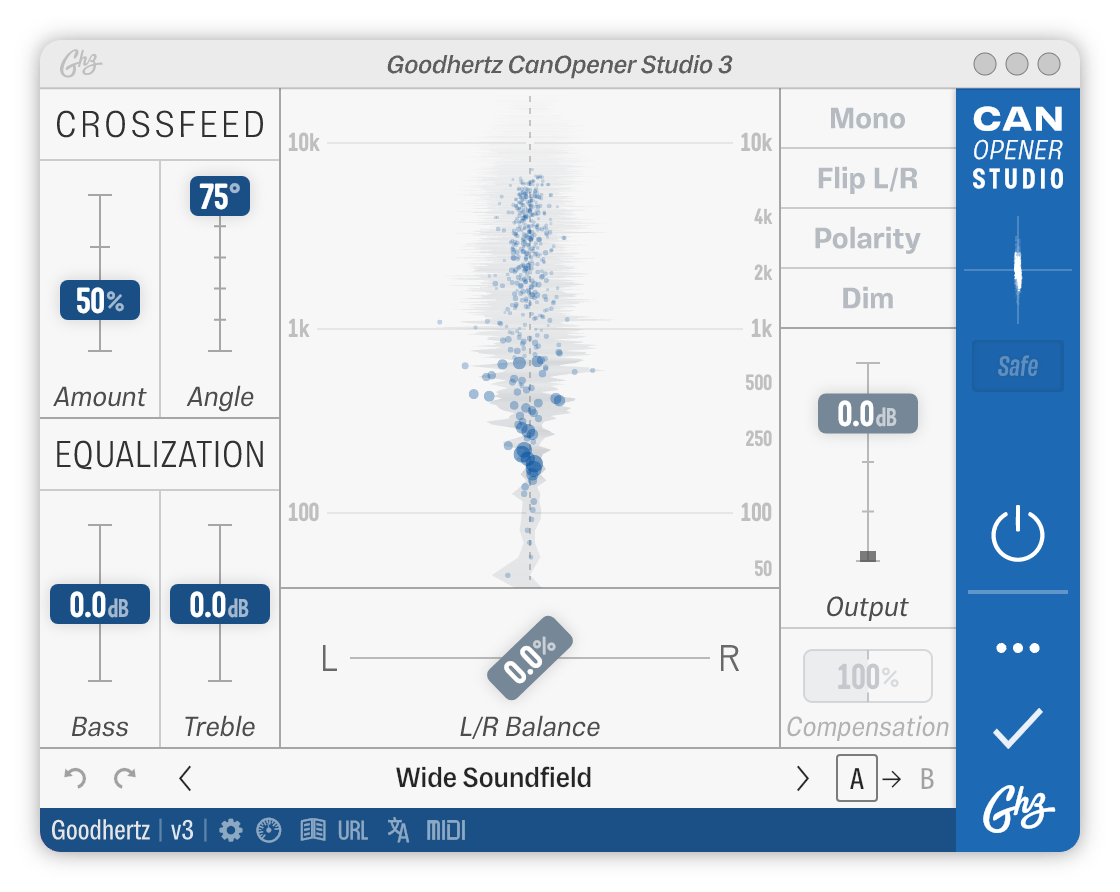
Here’s a screenshot of CanOpener Studio in action. Click anywhere on the interface to jump to a control’s definition below.

Advanced Controls

Background

“Crossfeed” is a generic term for a process that “feeds” or blends the left and right channels of a stereo audio signal in some way. Because sound is pretty good at bouncing and bending around things, every sound you’ve ever heard in a natural acoustic environment reaches both ears, at least in part. This is true for loudspeakers too: a sound fed from the right loudspeaker not only reaches your right ear, but a portion of the sound also reaches your left, far ear as well. The inverse is true of the left speaker: sounds emitted reach the left ear first, while a portion also reaches the right ear. So you could say that loudspeakers have a type of natural crossfeed: the left channel is “crossfed” to the right ear and vice versa.

For headphones, however, this is not true: sounds fed from the left channel of a pair of headphones only reach the left ear and have no natural crossfeed. CanOpener Studio’s crossfeed algorithm was designed to bring back the crossfeed that gets lost on headphones, making for a better, less fatiguing monitoring environment where judgements about space, depth, and panning are quicker and easier.

Visualization

Stereo Spectroscope

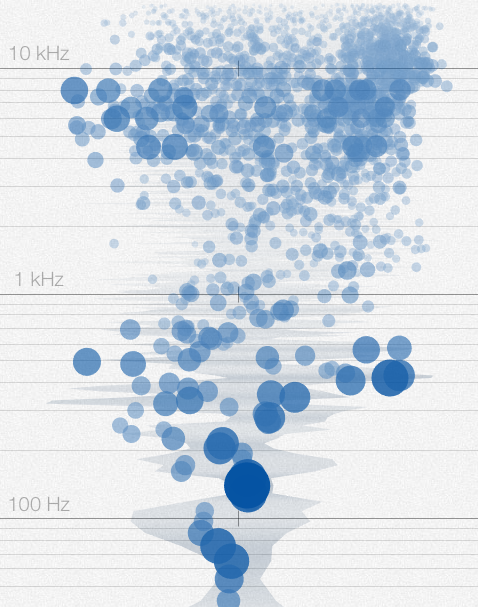
CanOpener Studio features our unique stereo spectroscope: a new type of stereo metering that lets you inspect the stereo balance & width of each part of the frequency spectrum.

The CanOpener Studio Stereoscope

What does it represent?

The x-axis (horizontal), represents the left/right stereo field, and the y-axis (vertical) represents the frequency spectrum (low to high, bottom to top).

The location of each circle corresponds to its left/right balance and associated frequency band. The size and brightness of the circle corresponds to the loudness of that particular band.

In addition to the circles, a broad outline shape is drawn, showing the stereo width for all frequency bands.

What should I use it for?

The stereo spectroscope can help determine how much crossfeed should be applied to the signal to imitate listening on monitors. If the scope shows a wide, dispersed stereo field (especially in the low end), then you might want to increase the crossfeed amount. If the scope is showing a narrow, straight-lined stereo field (especially in the low end), then less crossfeed is probably appropriate.

Goniometer

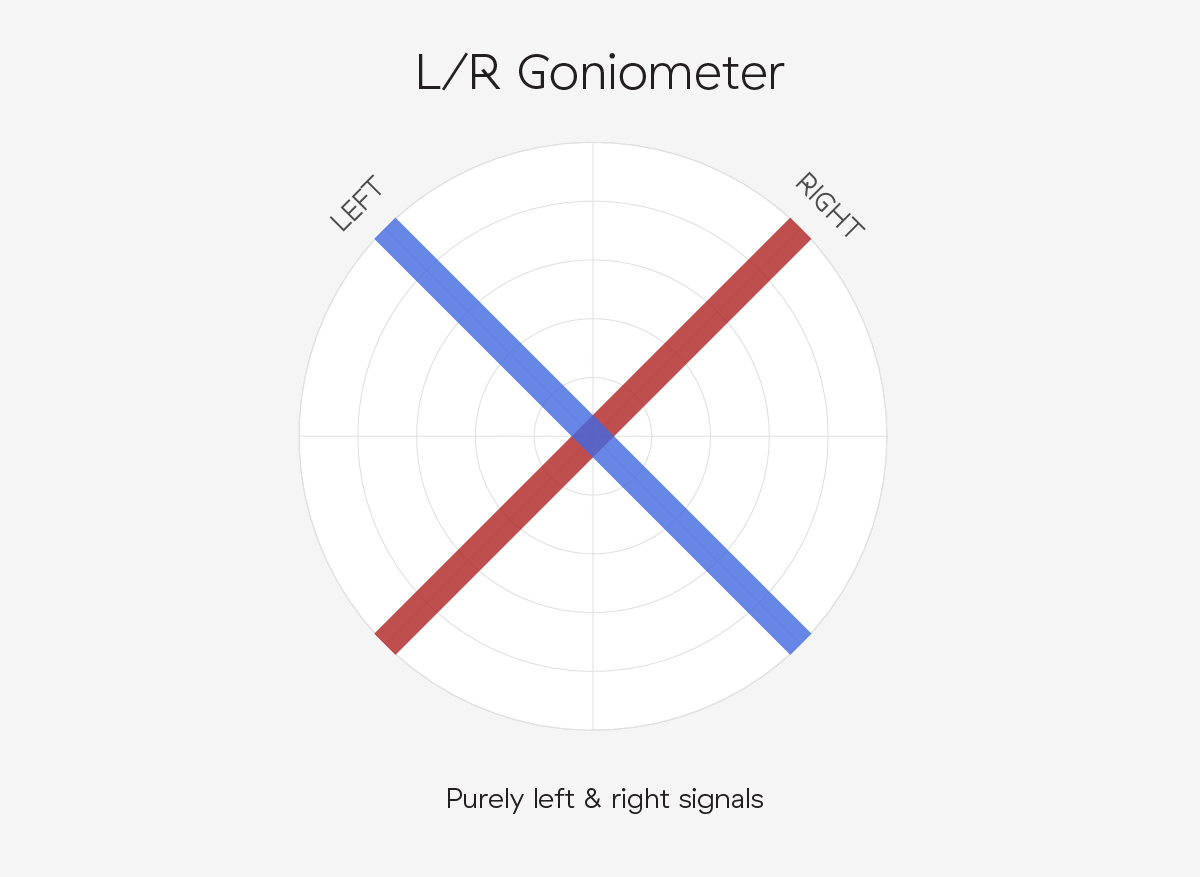
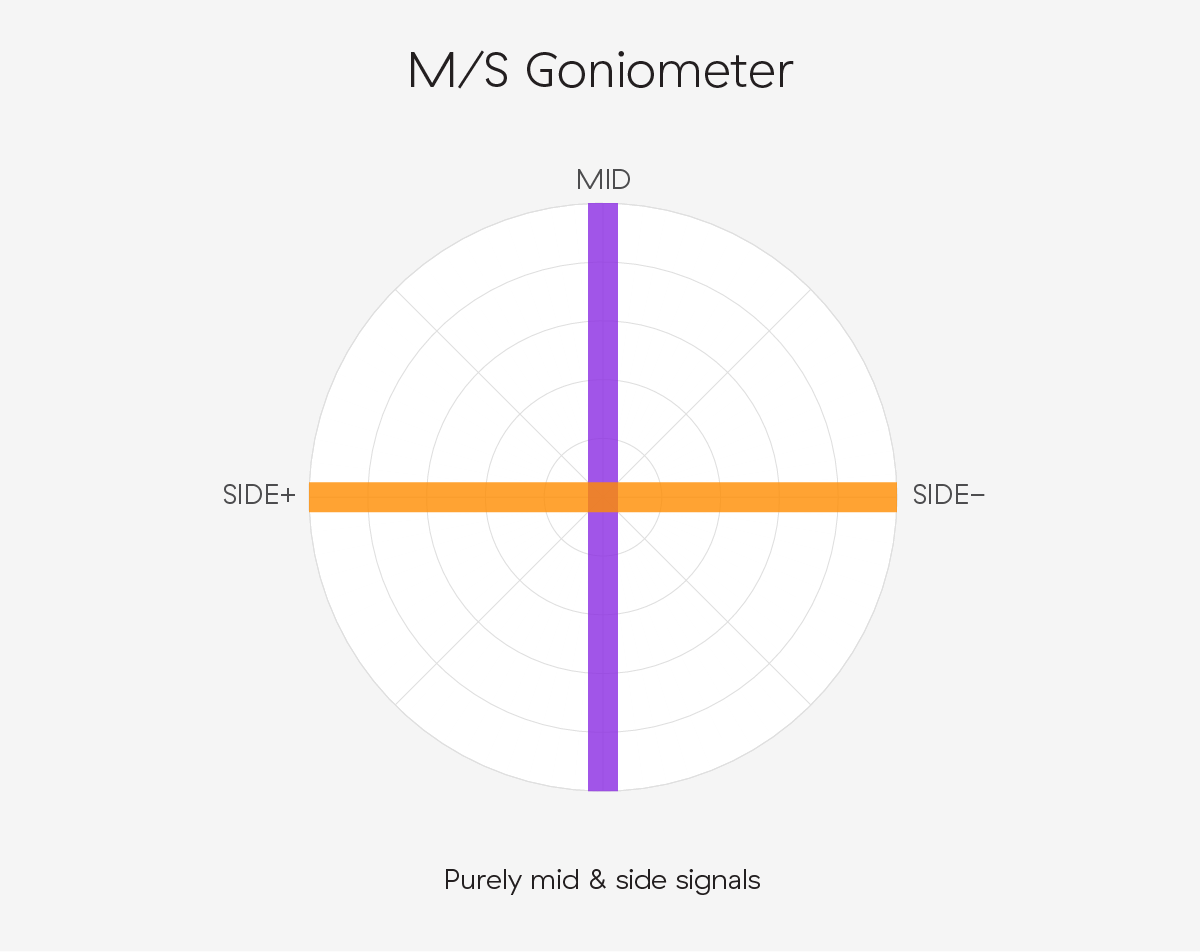
CanOpener Studio includes a real-time stereo display called a goniometer (or vectorscope). By interpreting the goniometer, it’s possible to quickly deduce many characteristics about the stereo field and the precise relationship between left & right channels.

Here are some examples of how simple stereo signals appear in the goniometer:

L/R Goniometer

M/S Goniometer

Controls

Primary Controls

Crossfeed

Amount

Varies the amount of crossfeed.

100% is generally a good starting point, though 150% is the truest to real-life loudspeaker listening. At 0%, the signal is totally unaffected.

  • Min 0%
  • Max 150%
  • Default 100%

Angle

Controls the width of the crossfeed soundstage.

Smaller speaker angles (less than 30°) place the sound more “in front” of the listener. Larger speaker angles (more than 45°) are more immersive and surrounding. This control affects the crossfeed only — not the entire soundstage.

  • Min
  • Max 75°
  • Default 60°

Equalization

The Equalization section borrows a portion of our esteemed Baxandall shelving filters from Tone Control to give you smooth, mastering-quality tone-shaping within CanOpener Studio.

Bass Gain

Amount of bass boost/cut.

To alter the center frequency of the bass shelf, see Bass Freq.

  • Min -15.0dB
  • Max 15.0dB
  • Default 0.0dB

Treble Gain

Amount of treble boost/cut.

To alter the center frequency of the treble shelf, see Treble Freq.

  • Min -15.0dB
  • Max 15.0dB
  • Default 0.0dB

Monitoring

L/R Balance

Controls the relative balance of the left and right channels.

Unlike a panner, L/R Balance acts as a stereo balancer (i.e. no gain is ever added to the left or right signal). At 100% (to the right), the left channel signal is silenced. At -100% (to the left), the right channel signal is silenced.

  • Min -100%
  • Max 100%
  • Default 0%

Mono

Sums the left/right channels to mono.

Options: Off, On

  • Default Off

Flip L/R

Swaps the left and right channels.

Options: Off, On

  • Default Off

Polarity

Inverts the phase of the right channel.

Options: Off, On

Use Polarity + Mono at the same time to monitor the sides of a stereo signal: all the information that differs between left and right channels.

  • Default Off

Dim

Turns down the output signal by the amount specified by Dim Level.

Options: Off, On

  • Default Off

Output Gain

Varies the output gain, post-crossfeed.

Output Gain includes a level meter embedded in the slider. This meter shows the peak level of the output signal after CanOpener Studio’s processing.

If the signal peak exceeds or equals 0.0dB the meter color turns red, indicating that clipping could occur. CanOpener Studio will never clip internally, due to its double-precision floating-point processing, but the signal might be clipped at a later stage (by the host/DAW or DAC).

  • Min -36.0dB
  • Max 12.0dB
  • Default 0.0dB

Compensation

Controls the amount of frequency compensation applied as Output Gain is changed.

Human perception of loudness varies depending on frequency and sound pressure levels, as described by equal-loudness contours, often called “Fletcher-Munson” curves.

In other words, as listeners we are more sensitive to the midrange than to low and high frequencies. This phenomenon is also further accentuated as the signal gets quieter, requiring more compensation to reach equal loudness. Using CanOpener’s Compensation can allow you to work at lower mixing/listening volumes while still maintaining a flat frequency response.

  • Setting the compensation at 100% will provide an optimal perceived loudness across the frequency range for all Output Gain settings.
  • At 0%, no compensation is applied, keeping the frequency response flat regardless of the Output Gain.
  • Anywhere above or below 100% will respectively exaggerate or attenuate the compensation applied.

Compensation is inactive when Output Gain is set to 0.0dB.
  • Min 0%
  • Max 200%
  • Default 100%

Master On/Off

Bypasses CanOpener Studio’s processing.

We recommend using the Master On/Off instead of your DAW’s plugin bypass to avoid digital artifacts.

  • Default On

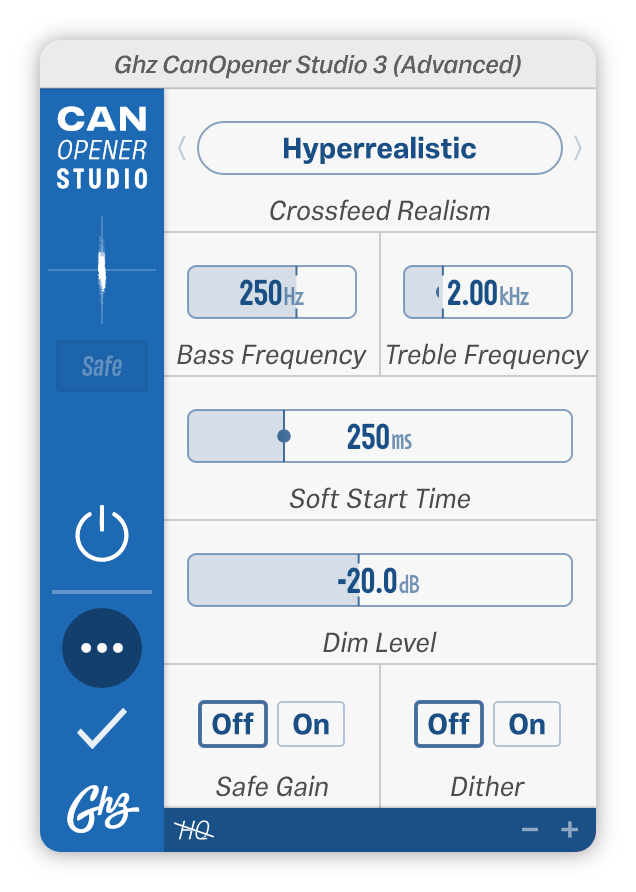
Advanced Controls

The Advanced section offers more precise control and fine adjustment options.

To access CanOpener Studio’s advanced controls, click the ••• icon in the sidebar.

Crossfeed Realism

Controls the degree of realism in the idealized speaker model.

Option Discussion
Hyperrealistic

Advanced delay and spectral modeling (recommended for most situations)

Realistic

Simplified delay modeling

Standard

The classic crossfeed algorithm. No delay

Though less realistic, “Standard” crossfeed realism has the advantage of a perfect, constant spatial frequency response.

  • Default Hyperrealistic

Bass Freq

Center frequency of the equalizer’s bass shelf.

  • Min 20Hz
  • Max 1.00kHz
  • Default 250Hz

Treble Freq

Center frequency of the equalizer’s treble shelf.

  • Min 1.00kHz
  • Max 20.0kHz
  • Default 2.00kHz

Soft Start Time

Controls the Soft Start fade-in time.

Soft Start gently ramps up the volume when playback begins. This helps avoid loud transients that occur when starting playback in the middle of a phrase and minimizes listener fatigue (particularly important in long tracking, editing, or mixing sessions).

Soft Start Time can be set via tap tempo. Use the T key when the control is highlighted to tap in your desired tempo.

  • Min 0ms
  • Max 1.000s
  • Default 250ms

Dim Level

Sets the gain that is applied when the Dim is activated.

  • Min -36.0dB
  • Max 0.0dB
  • Default -20.0dB

Safe Gain

Lowers the output volume to a “safe” level, to guarantee that clipping will not occur in the output signal.

Options: Off, On

  • Default Off

Dither

Applies dithering to the output signal in order to reduce quantization distortion.

Options: Off, On

  • Default Off

HQ Mode

HQ Mode is our no-holds-barred processing mode where super high quality audio is given priority over CPU usage.

When HQ Mode is turned On, CanOpener Studio uses a higher precision algorithm, providing better spectral resolution at the expense of some added latency (~50 ms) and higher CPU usage.

Option Symbol
Off

On

We recommend using HQ Mode when you need the highest possible quality and don’t mind 2-4x higher CPU usage. An important lead instrument, vocal, or a mastering session is a great place for HQ Mode.

HQ Mode cannot be MIDI mapped since automating it is not recommended.

HQ Mode will require more CPU resources and result in a slightly higher processing delay (latency). To ensure proper delay compensation in your host/DAW, automating HQ Mode is not recommended.

  • Default Off

Specs

Supported Channel Configurations

Input Channel # Output Channel #
2 2

Acknowledgements

Annlie Huang / Chris Conover / Diana Zheng / Ewan Macpherson / Jack Stratton / Mark A. Jay / Ollie Hammett / TaeHo Park

Authors

Devin Kerr / Rob Stenson / Jasper Duba / Noah Dayan

Translators

TaeHo Park / Tiago Frúgoli / Gustavo Guzmán / Reda Kermach / Noah Dayan / Gal Cohen / Sydney Bolton / Enrico Cirene

About Goodhertz Plugins

User Interface

Goodhertz plugins are made to be workhorse tools that sound amazing. We’ve put a lot of thought and care into the audio quality and plugin usability, and for that reason, we’ve opted for simple and direct controls & interfaces that don’t rely on photorealistic knobs or ornamental screw heads to communicate their meaning.

We’ve also decided to only include meters and graphs when we feel they will directly lead to a better sonic result. Meters/graphs can consume significant CPU resources, and we firmly believe that if it sounds good, it is good.

Our meters can be reset at any time using the “Reset Meters” button (in certain plugins) and manually enabled or disabled via the “Enable Metering” User Preference.

Preset Bar

Button Action
Undo the last parameter change.
Redo the last parameter change.
Switch to the previous preset.
“Preset Name” Opens the preset drawer (Option/Alt + Click to reset all plugin settings to preset).
Switch to the next preset.
Selects the A settings state.
This copies the current settings to the opposite A/B state; i.e. if you’re on the A state, clicking the arrow will copy those settings to the B state.
Selects the B settings state.

Toolbar

Introduced in version 3.10, the toolbar at the bottom of the plugin holds a handful of shortcut buttons.

Icon Action
Opens preferences menu
Shows diagnostic information
Opens plugin manual in your default web browser
Opens a URL representation of the current plugin control state (Command/Ctrl + Click to copy the URL to the clipboard)
Opens language-selection menu
Opens MIDI Learn menu
Shrink interface
Enlarge interface

Keyboard Shortcuts

Action Keyboard Shortcut
Enter New Parameter Value Once you’ve tapped or double-tapped a control, type in a value, then hit Enter, Return, or Tab
Increment Parameter Value or arrow keys
Decrement Parameter Value or arrow keys
Jump to Next Parameter Tab
Jump to Previous Parameter Shift + Tab or ` (backtick)
Escape Parameter Focus / Close any Open Drawers Esc
Tap Tempo t or Click (N.B. For this to work, you must have a BPM or milliseconds control selected.)
Save Preset n (N.B. For this to work, the preset panel must be open.)
Set Preset as Favorite f (N.B. For this to work, the preset panel must be open.)
Edit Preset e (N.B. For this to work, the preset panel must be open.)
Update Preset u (N.B. For this to work, the preset panel must be open.)
Delete Preset Delete (N.B. For this to work, the preset panel must be open.)

Right-Click Actions

Action Instruction
Read about Control in manual Right-Click & select “Show in Plugin Manual”
Reset Control to Default Right-Click & select “Reset to Factory Default Value”
Lock Control when switching presets Right-Click & select “Lock When Switching Presets”
Copy current plugin settings to clipboard Right-Click & select “Copy as URL to Clipboard”
Paste all plugin settings from clipboard Right-Click & select “Paste From Clipboard”
Reset all plugin settings to Defaults Right-Click & select “Reset All to Defaults”
Reset all plugin metering Right-Click & select “Reset Meters” (only available in certain plugins)
Reset all plugin settings to Preset Right-Click & select “Reset to [preset] Preset”
Update Preset with current plugin settings Right-Click & select “Update [preset] Preset”
Create new Preset with current plugin settings Right-Click & select “Create New Preset”
Go to the plugin’s manual page Right-Click & select “Read [plugin name] Manual”

Right-Click Preferences

Action Explanation
Language Switch the display language of text elements in Goodhertz plugins. We currently support the following languages: English, Spanish, Portuguese, French, Italian, Japanese, Korean, Chinese (Simplified), Chinese (Traditional), and Arabic.
Always Open Advanced Pane By default, this is Off — i.e. when the plugins open, they do not show you the advanced controls available by hitting the ••• button in the sidebar. If you’d like to always see the advanced controls, enable this preference.
Control Granularity By default, all Goodhertz controls move in small increments when dragged. If you prefer controls to operate with larger increments by default, change this option to Coarse. N.B. This will swap the behavior of the Shift mouse modifier - i.e. Shift-dragging will move a control with standard granularity when set to Coarse.
Dark Mode Allows you to choose the color palette used for displaying the interface. If you prefer the look of dark colors (or work in a darker environment) enable this option. The Auto option will automatically adjust the color scheme depending on the system preferences of your machine (Mac only).
Enable Hover Markers By default, this is On — i.e. all controls will show markers on hover. If you find this behavior unnecessary, deselect this option and no markers will be shown.
Enable Metering By default, this is On — i.e. in normal operation, all audio meters and visualizations available in Goodhertz plugins are enabled and running. If you’d like to turn them off and disable all metering and visualization, deselect this option. And to turn them back on, simply reselect it. N.B. If you’re struggling to use a large number of Goodhertz plugins on an older processor with an integrated GPU, sometimes disabling metering can help.
Enable Scroll Input By default, all Goodhertz sliders can be scrolled in addition to dragged. If you find this behavior unnecessary, deselect this option and no scrolling events will be used to control Goodhertz sliders.
Enable Tooltips By default, this is On — i.e. all controls will show a tooltip on hover. If you find this behavior unnecessary, deselect this option and no tooltips will be shown.
GPU Acceleration By default, this is Enabled — i.e. the GPU will be prioritized whenever possible to improve graphics performance. If your graphics card does not support GPU acceleration, this preference will be automatically set to Reduced. N.B. If you experience graphics issues, disabling this preference may help.
Keyboard Focus By default, you can get keyboard focus on any Goodhertz control with a single click. Change this option to ensure keyboard focus only occurs on double clicks.
Window Size Enlarge or shrink the Goodhertz plugin window by selecting an option here. This will save your preference for all instances of this plugin.
Diagnostics Displays general information about the plugin and the configuration of your system for diagnostic purposes. If you experience any issues with the plugin, it can be helpful to include this information when contacting us. N.B. Clicking this window will copy the contents to the clipboard.
MIDI Learn Configure the mapping used to control parameters via MIDI messages. To assign a MIDI number to a control, enable MIDI Learn and send a MIDI message while a control is focused. To remove an assigned mapping, click on a mapping entry in the list or select Clear All to reset the entire mapping. N.B. You can assign different types of MIDI messages including Pitch Bend, Note, and CC messages.

Mouse Modifiers

Action Combination (Mac) Combination (Windows)
Reset Parameter to Default Value Option + Click Alt + Click
Move Control with Coarse Precision Shift + Drag Shift + Drag
Move Control with Fine Precision Command + Drag Ctrl + Drag
Move Control with Normal Precision Drag Drag

Automation

Unintentional digital clicks and pops are the worst. They happen for lots of reasons and often end up wasting your time with needless revisions or mastering surgery. When they go unnoticed, they can make their way onto commercial albums and releases.

Plugin automation is a common cause of clicks and pops. Sweeping an EQ band, changing a delay setting, and even automating a plugin bypass can cause digital artifacts if poorly handled.

This is not true for Goodhertz plugins. Any parameter in a Goodhertz plugin, even on/off switches, can be automated freely and smoothly without clicks, pops, or zipper noises (unless otherwise noted). You can push them, pull them, LFO them — whatever you do, they’ll handle it gracefully.

Since our Master On/Off controls won’t create artifacts, we recommend that you use them rather than your DAW-supplied plugin bypass if you want to disable plugin processing.

Plugin Settings

Goodhertz plugin settings can be copied and pasted as text urls, which look like this: https://goodhertz.com/vulf-comp/3.0.9?cm=0&wf=0&lf=100&lfc=50

To copy and paste, right click anywhere on the plugin interface and select either the copy or the paste option.

E.g. If you paste “https://goodhertz.com/vulf-comp/3.0.9?cm=0&wf=0&lf=100&lfc=50” into Vulf Compressor it will recall the settings associated with that url. This way you can easily send an exact plugin setting to someone — in an email or even a tweet — without any guesswork or screenshots.”

System Requirements

Mac OS X ≥ 10.13

Audio Unit 64-Bit, VST 64-Bit, VST3 64-Bit, or AAX 64-Bit host

Windows ≥ 10

VST 64-Bit, VST3 64-Bit, or AAX 64-Bit host

Contact Support

To send plugin feedback, please e-mail us at feedback@goodhertz.com.

If you have a quick question, send us a tweet @Goodhertz. We’re often able to respond faster to tweets than emails.

If you’re having trouble, experiencing a technical issue, or you think you’ve found a bug, please email support@goodhertz.com.

Find all our contact info & bug-reporting protocol on the contact page.